


See the Full Slab: Selection & Purchasing Guide
Begin Here: Your Purchasing Journey
Choosing a slab is the most visible decision in your project, and it deserves more than a glance at a small sample. This guide walks you through the full purchasing journey, step by step: start with the right material for your application, evaluate the full slab, inspect actual slabs at our showroom, confirm every product detail, qualify independent fabricators, compare written quotes, and move through purchase to installation with every approval in place.
We are Verona Quartz Surfaces, a family owned wholesale supplier of full slabs in Sun Valley, California. We supply full slabs only. We do not fabricate, cut, template, or install. Fabrication and installation are performed by independent qualified fabricators and installers that you select, and much of this guide is devoted to helping you choose them well.
This is a purchasing guide. It covers selection through purchase. For the installation phase itself, our Installation Readiness Guide goes deeper on site readiness, sequencing, and what to expect on installation day, and we link to it rather than repeat it here.
On This Page
Download the See the Full Slab Guide (PDF)
Start With The Material, Not The Sample
Why Performance Comes Before Color
Most buyers start with color and work backward. We suggest the reverse. A design you love in the wrong material for your application will disappoint you for years, while the right material in a design you chose with full information becomes the surface you stop thinking about because it simply performs. Before you fall in love with a pattern, decide which of our three materials fits how you live, where the surface will go, and what it will be asked to handle every day.
Match The Material To The Application
Our slabs serve a wide range of residential and light commercial applications. As you read the material profiles below, keep your own project list in front of you:
- Kitchen countertops and islands
- Waterfall edges
- Full height backsplashes
- Bathroom vanities
- Shower walls
- Fireplace surrounds
- Interior wall cladding
- Outdoor kitchens
The Three Materials We Supply
Engineered quartz. Our standard jumbo slab measures 126 by 64 inches at 20 mm thick, for interior use only. Quartz is a nonporous surface, and it carries a lifetime residential material warranty, subject to terms. On heat: quartz is heat resistant, not heat proof. Discoloration can occur with sustained exposure above 300 degrees Fahrenheit, so always use trivets or hot pads under hot cookware.
Porcelain. Our porcelain panels measure 126 by 64 inches, at 12 mm thick. Porcelain is rated for interior and exterior use, carries a 25 year warranty, and never requires sealing.
Sintered stone. Our sintered stone slabs measure 126 by 64 inches in both 12 mm and 20 mm thicknesses. Sintered stone is rated for interior and exterior use, carries a 25 year warranty, and is made with a resin free mineral body.
Side By Side Material Comparison
| Consideration | Engineered Quartz | Porcelain | Sintered Stone |
|---|---|---|---|
| Indoor and outdoor use | Interior use only | Interior and exterior rated | Interior and exterior rated |
| Slab size | 126 by 64 in | 126 by 64 in | 126 by 64 in |
| Thickness | 20 mm | 12 mm | 12 mm and 20 mm |
| Heat and UV guidance | Heat resistant, not heat proof. Discoloration can occur above 300 degrees Fahrenheit. Always use trivets or hot pads. Interior use only. | Interior and exterior rated. Review heat guidance on the product page for your design. | Interior and exterior rated. Review heat guidance on the product page for your design. |
| Porosity and sealing | Nonporous, never requires sealing | Nonporous, never requires sealing | Nonporous, never requires sealing |
| Daily maintenance | Nonporous and straightforward to clean; avoid harsh chemicals | Never requires sealing; simple cleaning. | Never requires sealing; simple cleaning. |
| Fabrication notes | All three materials are cut, edged, and installed by independent fabricators, not by us. Large format porcelain and sintered panels call for specialized equipment and proven experience with the exact material. Confirm this during fabricator interviews in Chapter 5. | ||
| Warranty | Lifetime residential material warranty, subject to terms | 25 year warranty; review the full warranty terms on the product page | 25 year warranty; review the full warranty terms on the product page |
| Appearance | Designs range from quiet and uniform to boldly veined across all three materials. Judge each design by its full slab image, never by a small sample alone. | ||
Material warranties cover the slab material itself under their stated terms. They are not workmanship warranties. The quality of cutting, edging, seaming, and installation is covered, if at all, by your independent fabricator and installer. See Chapter 5.
Your Material Decision, Step By Step
- List every application in your project, room by room.
- Mark each one indoor or outdoor. Anything outdoors or in direct sun rules out quartz, which is interior use only.
- Check your largest single piece against slab sizes. A 126 by 64 inch slab covers most islands; confirm with your layout.
- Be honest about heat habits. If hot pans meet the counter often, quartz asks you to commit to trivets every time.
- Decide how much maintenance thinking you want to do. Porcelain never requires sealing, which matters to some households and not at all to others.
- Read the warranty terms on the product page for each design you shortlist.
- Record your shortlist with exact product names and page URLs before moving to Chapter 2.
Worksheet 1: Material Selection — Quick Check
- Which rooms and applications will use this surface?
- Will any surface be outdoors or in direct sun? Only porcelain and sintered stone are exterior rated.
- What is the largest single piece your layout needs, and does a 126 by 64 inch slab cover it?
- Do you place very hot cookware directly on the counter? Quartz is heat resistant, not heat proof, and asks for trivets every time.
- How important is a surface that never requires sealing?
- Which warranty terms matter most, and have you read them on the product page?
- What are the exact product names and page URLs for your shortlisted designs?
Use the printable guide to record your answers and compare your selections: Download the See the Full Slab Guide (PDF).
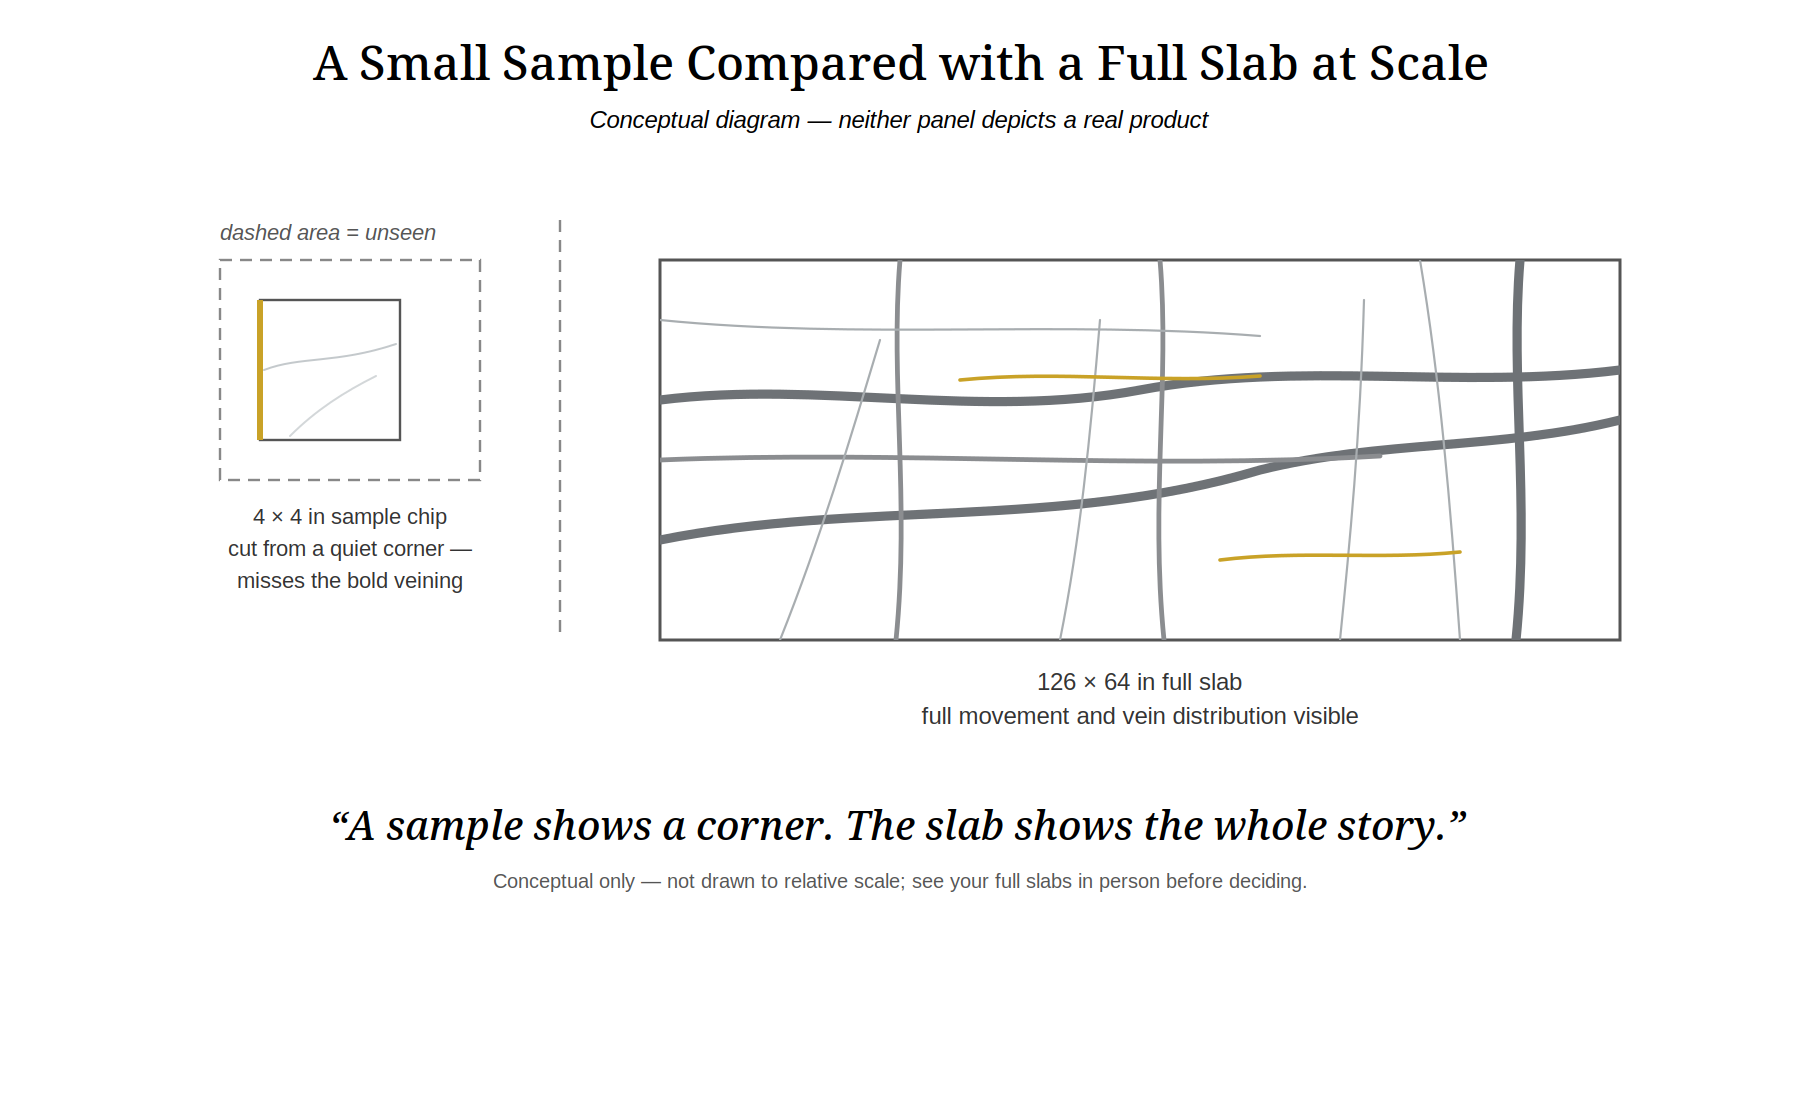
Figure 1-1. A small sample shows a corner of the pattern. The full slab shows the whole story. (Conceptual diagram.)
Evaluate The Full Slab And See How It Looks Installed
What A Small Sample Cannot Show You
A sample is a few inches across. A slab is more than ten feet long. No sample, however accurate its color, can show you how a pattern behaves at full scale: how large a vein grows across 126 inches, where the movement concentrates and where it rests, whether the pattern has a direction, and how much of the slab is quiet background. Choosing from a sample alone is how buyers end up surprised by a bold vein crossing their island or by a design that reads far busier installed than it did in their hand. The sample starts the conversation. The full slab image finishes it.
One exception: if you are choosing a monochromatic or solid quartz, or a sparkle grained quartz with a fine, even speckle, the sample can be enough. Those colors read uniform across the slab the majority of the time, so what you hold is very close to what you get. For anything with veining or movement, the full slab image still carries the decision.
Read The Full Slab Like A Professional
When you open a full slab image, evaluate it the way our showroom staff does, element by element:
- Background tone. The dominant color of the slab body, judged in neutral light, not in your mind's memory of the sample.
- Undertone. The warm or cool cast sitting underneath the background tone. Undertones decide whether a slab harmonizes with your cabinets and flooring or quietly fights them.
- Movement. How the pattern flows across the surface: soft and cloudy, linear and directional, or dramatic and high contrast.
- Vein scale and distribution. Are the veins fine or bold, sparse or dense, evenly spread or clustered in zones? Note the pattern character — structured, flowing, organic, clouded, or diffused. A cluster you love on screen becomes a permanent feature on your counter.
- Directional patterns. Some designs have a clear direction. Direction affects how the slab can be oriented, where seams fall, and whether a waterfall edge continues the pattern convincingly.
- Finish. Confirm the exact finish of the SKU you are considering, and note how it reads in the image: light behaves differently on every finish.
- Slab to slab variation. Natural looking designs vary from slab to slab. The image shows one representative slab, not a promise that every slab looks identical. Chapter 3 covers how to handle this in person.
Use Our Product Pages The Right Way
On every veronaquartz.com product page, the full slab image is shown first, with real installed project photos following in that product's image gallery. Scroll or click through the gallery to see how the design reads once it is in a finished space: on a horizontal countertop under task lighting, on a vertical full height backsplash, next to real cabinetry. This is the closest you can come to seeing your project before it exists.
One honest note: not every design has installed photos, but the majority of our product pages carry real installed images from our network of fabricators, contractors, dealers, and architects — essentially a collection of our clients' finished work. We do not install countertops ourselves; these photos show what our clients and their trades built with our slabs. Where a gallery exists, use it. Where it does not, the full slab image plus a showroom visit carry the decision.
Upright Slab Views Versus Installed Views
A slab viewed upright on an A-frame rack in a warehouse reads differently than the same slab installed. Three effects cause most of the difference:
- Orientation. Horizontal on a counter, the pattern spreads under your hands and your lighting. Vertical as cladding or a full height backsplash, the same pattern stacks and draws the eye upward. A directional design can look calm one way and restless the other.
- Distance. Stand back, literally or by zooming out. Bold veining that thrills at arm's length can dominate a room from ten feet away, and fine detail that looks plain up close can give a surface its depth from across the kitchen.
- Lighting. Warm under cabinet lighting, cool daylight, and dim evening light each pull different undertones out of the same slab. Compare the gallery photos taken in different light, and notice which version matches the light in your own rooms.
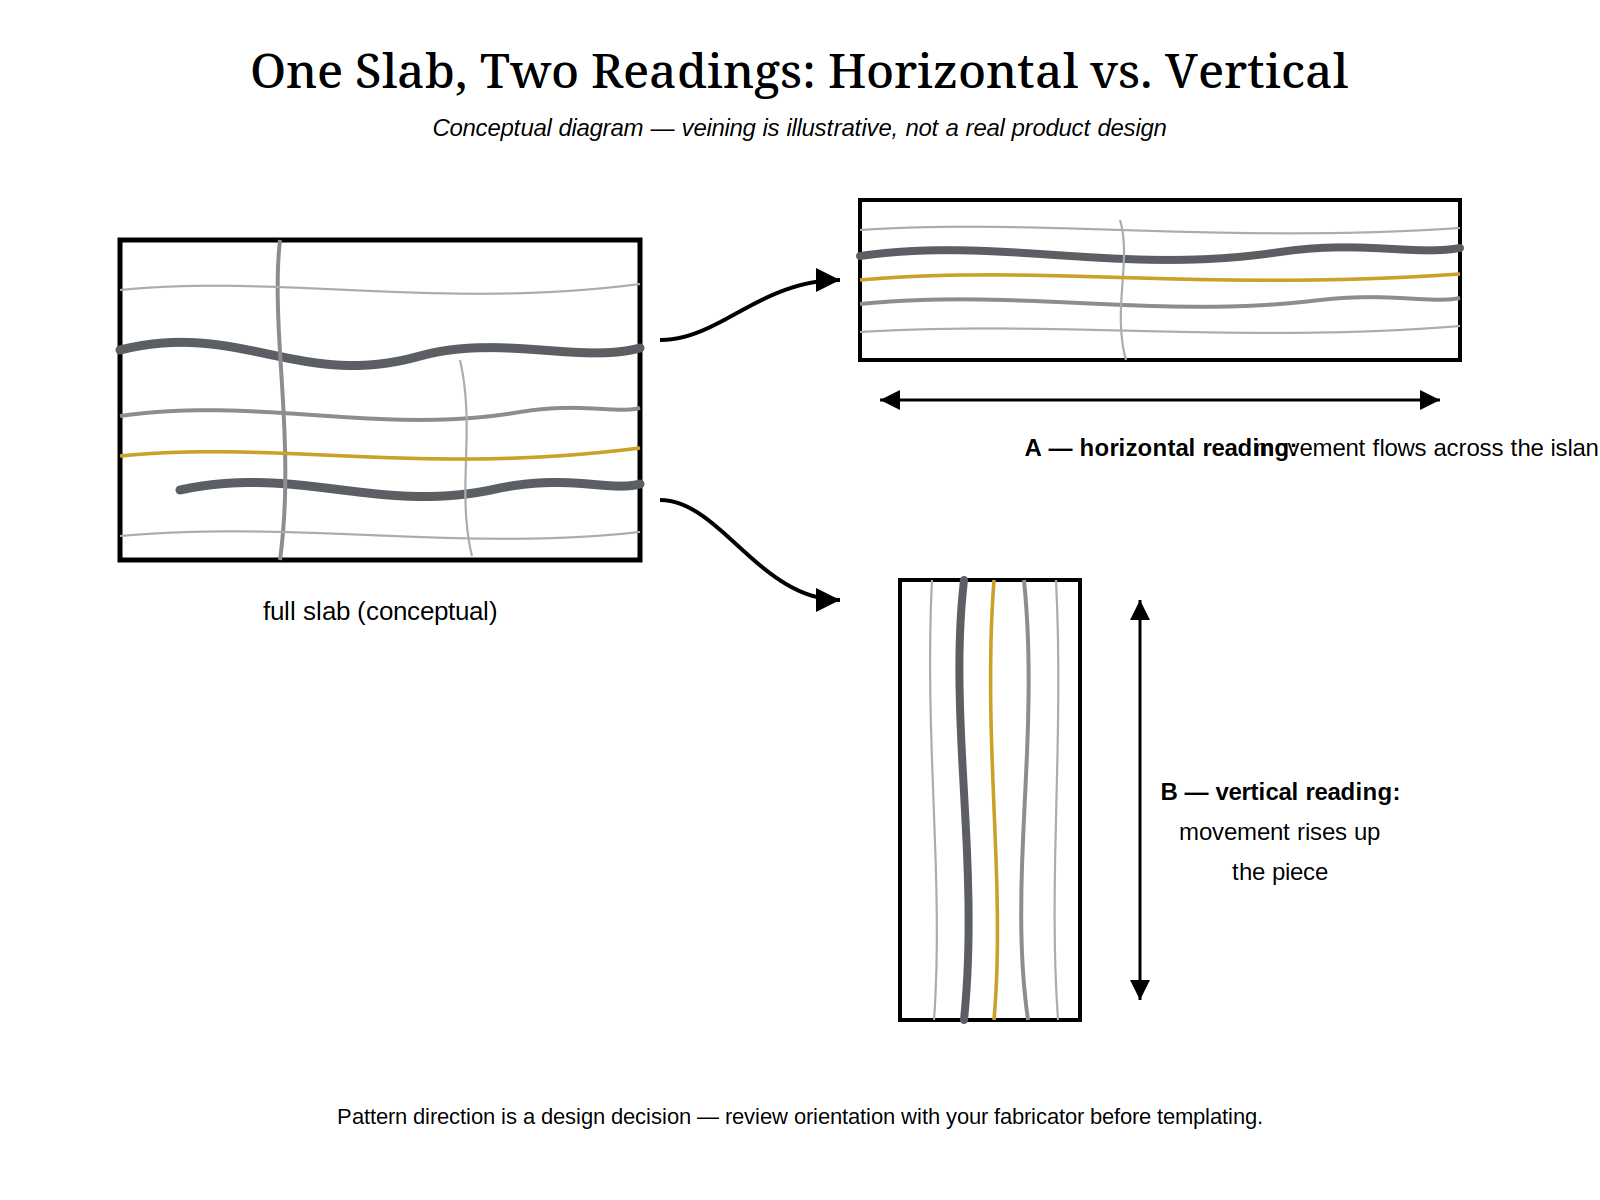
Figure 2-1. The same veining reads differently in horizontal and vertical installations. (Conceptual diagram.)
Questions To Ask Before Choosing From A Screen
- Have I seen the full slab image, not just the sample or a cropped detail?
- Have I clicked through every installed photo in the gallery, in different light and orientations?
- Can I describe the undertone in my own words, and does it agree with my cabinets, flooring, and paint?
- Where does the boldest movement sit, and am I comfortable with it landing on my island or main counter run?
- Does the pattern have a direction, and have I thought about how it will orient on my layout?
- Am I judging color on a calibrated, reasonably bright screen, not a dim phone in a dark room?
- Have I recorded the exact product name, SKU, and page URL so the slab I choose online is the slab I ask about in the showroom?
If you cannot visit our showroom, our online samples program lets you order samples to evaluate at home. Treat the sample as a color reference only; every scale and movement judgment still belongs to the full slab image.
Worksheet 2: What to Look For in the Full Slab
- Does the background tone look the same across the full slab as it does in the sample?
- Is the undertone warm, cool, or neutral, and does it agree with your cabinets and flooring?
- How does the movement and flow read at full scale?
- Are the veins fine or bold?
- Are the veins evenly distributed, or concentrated in certain areas?
- Is the pattern directional, and if so, which way does it run?
- What finish is listed for this SKU, and how does it read in the image?
- Which areas of the pattern would you want visible in your finished countertop, and which would you avoid in your layout?
Use the printable guide to record your answers and compare your selections: Download the See the Full Slab Guide (PDF).
Worksheet 3: Product Gallery Checklist
- Open the product page through Find Your Stone.
- Study the full slab image first, at full size.
- Name the background tone and undertone in your own words.
- Trace the movement and mark where veins cluster.
- Click through every installed photo in the gallery.
- Compare how the design reads in different light and orientations.
- Confirm SKU, dimensions, thickness, finish, and warranty on the page.
- Save the exact product name, SKU, and page URL.
Use the printable guide to record your answers and compare your selections: Download the See the Full Slab Guide (PDF).
Inspect The Actual Slab At The Showroom
Photography gets you most of the way. Standing in front of the actual slab gets you the rest. Scale, true color, and the way light moves across a full surface cannot be fully rendered on a screen, and a showroom visit is where you confirm that the design you chose online is the design you want in your home. To schedule a visit, reach us through our Contact page.
Prepare For The Visit
An hour of preparation makes the visit twice as productive. Bring:
- Cabinet door, paint chip, and flooring samples, the real materials, not phone photos of them
- Approximate dimensions of your countertops, island, backsplash, or other applications
- A list of your planned applications, room by room
- Your saved product names, SKUs, and page URLs from Chapter 2
- This guide, with your worksheets filled in so far
Look From A Distance, Then Up Close
Start ten or more feet back. This is how the slab will read when you walk into the room, and it is the view photography flattens. Notice the overall impression before you notice the detail: calm or energetic, light or grounded, warm or cool. Then move in close and confirm the particulars: the undertone against your cabinet sample, the crispness of the veining, the finish. Hold your cabinet and flooring samples directly against the slab, not a foot away from it. Adjacent comparison is the only comparison that counts.
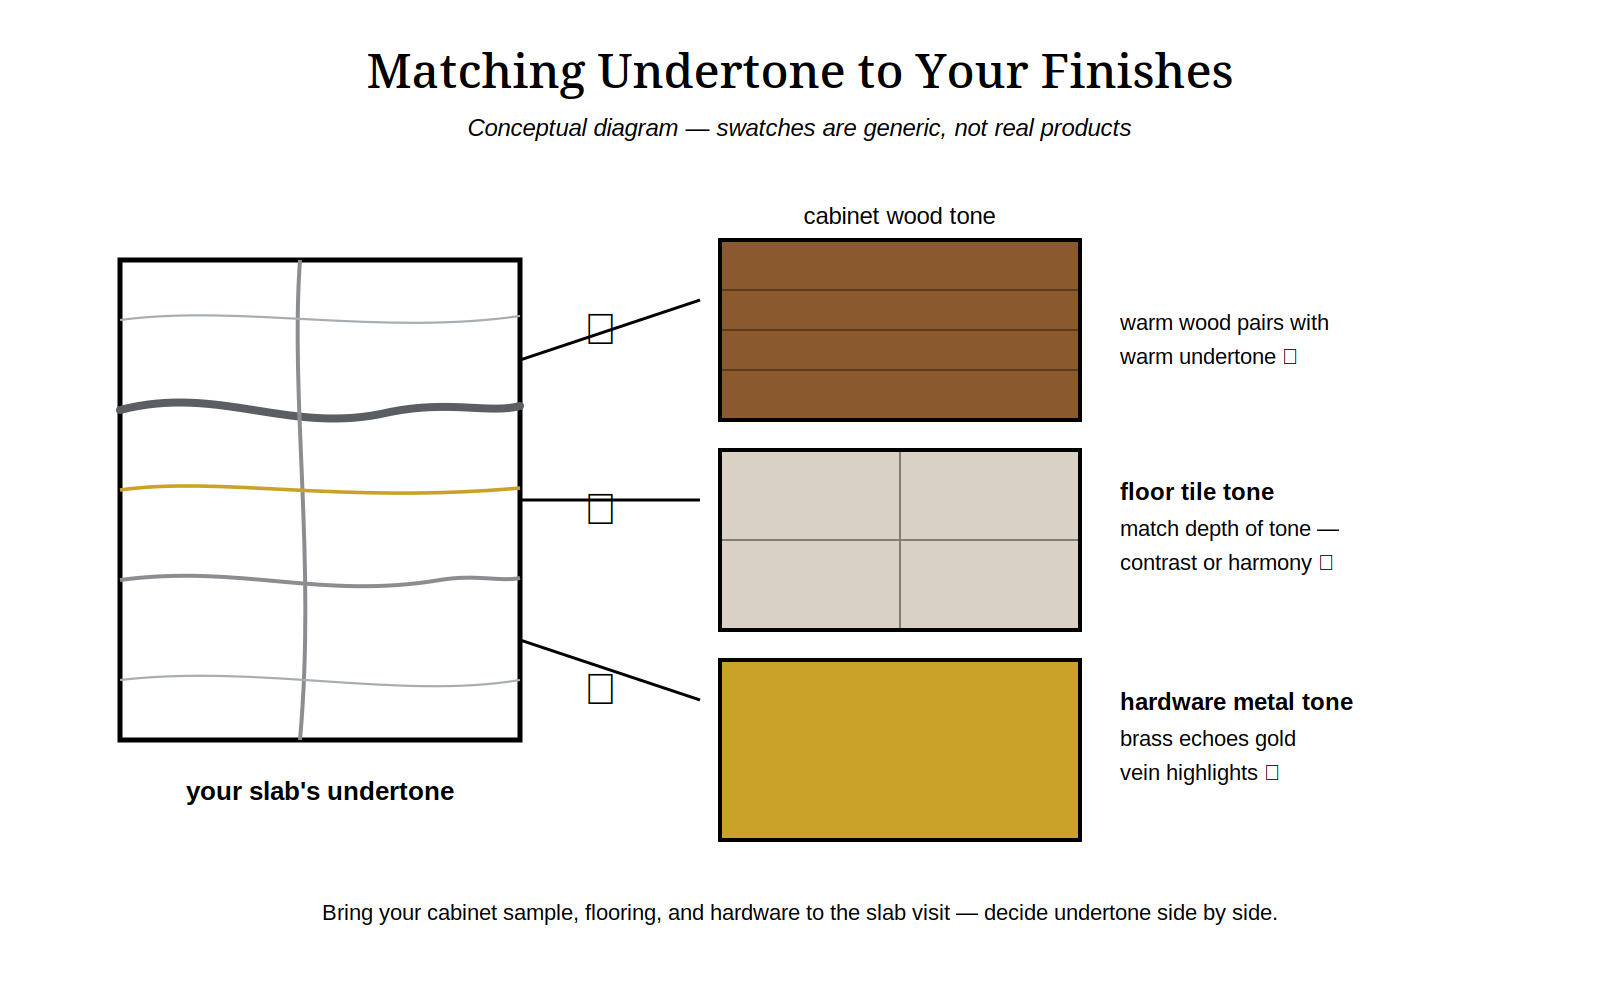
Figure 3-2. Compare the slab's undertone against your cabinets, flooring, and hardware. (Conceptual diagram.)
Ask To See Slabs In Natural Daylight
Warehouse lighting is consistent, which is useful, and it is also incomplete. Ask our staff whether you can view your shortlisted slabs in natural daylight, not only under warehouse lighting. Undertones shift between the two, and since your kitchen lives in daylight for much of the day, you want to approve the slab in the light it will actually live in.
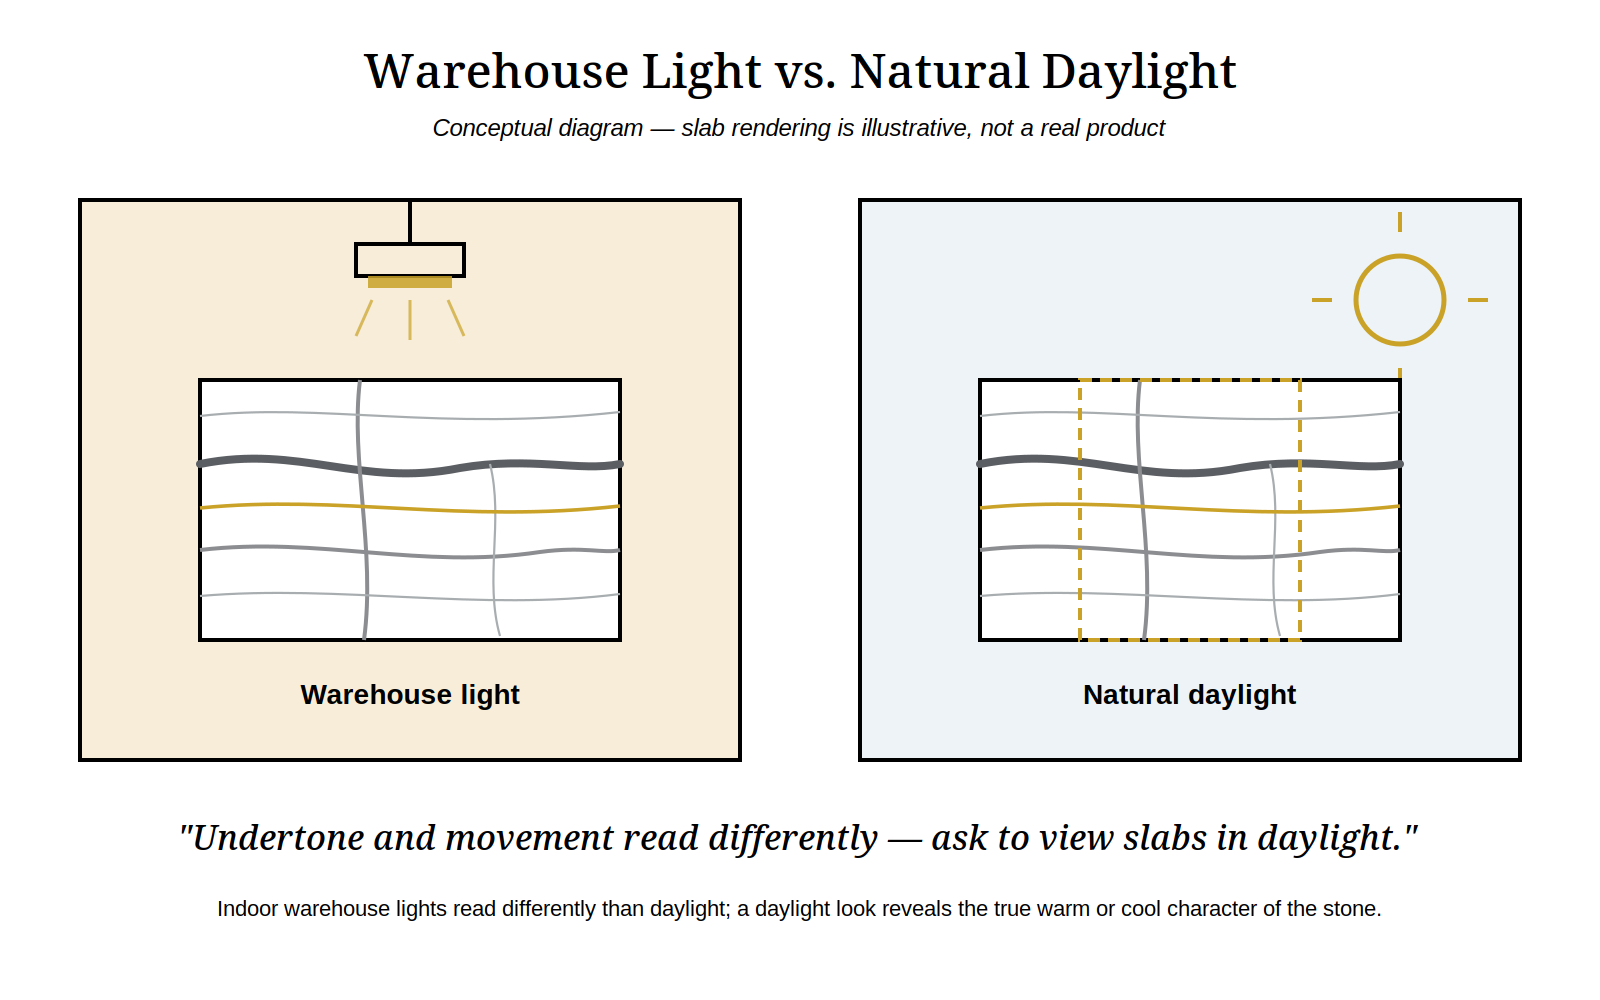
Figure 3-1. Undertone and movement read differently in warehouse light and natural daylight. (Conceptual diagram.)
Compare Slabs, Batches, And Book Matched Pairs
Ask to see more than one slab of your chosen design. Compare vein distribution, scale, and background tone across them so you understand the natural range of the design. If your project calls for it, ask about book matching: two consecutive slabs whose veining mirrors along a shared edge, opening like the pages of a book. When book matching matters to your layout, ask to examine the actual pair together, in sequence, exactly as they would be placed. Do not approve a book matched pair from descriptions or from photos of different slabs.
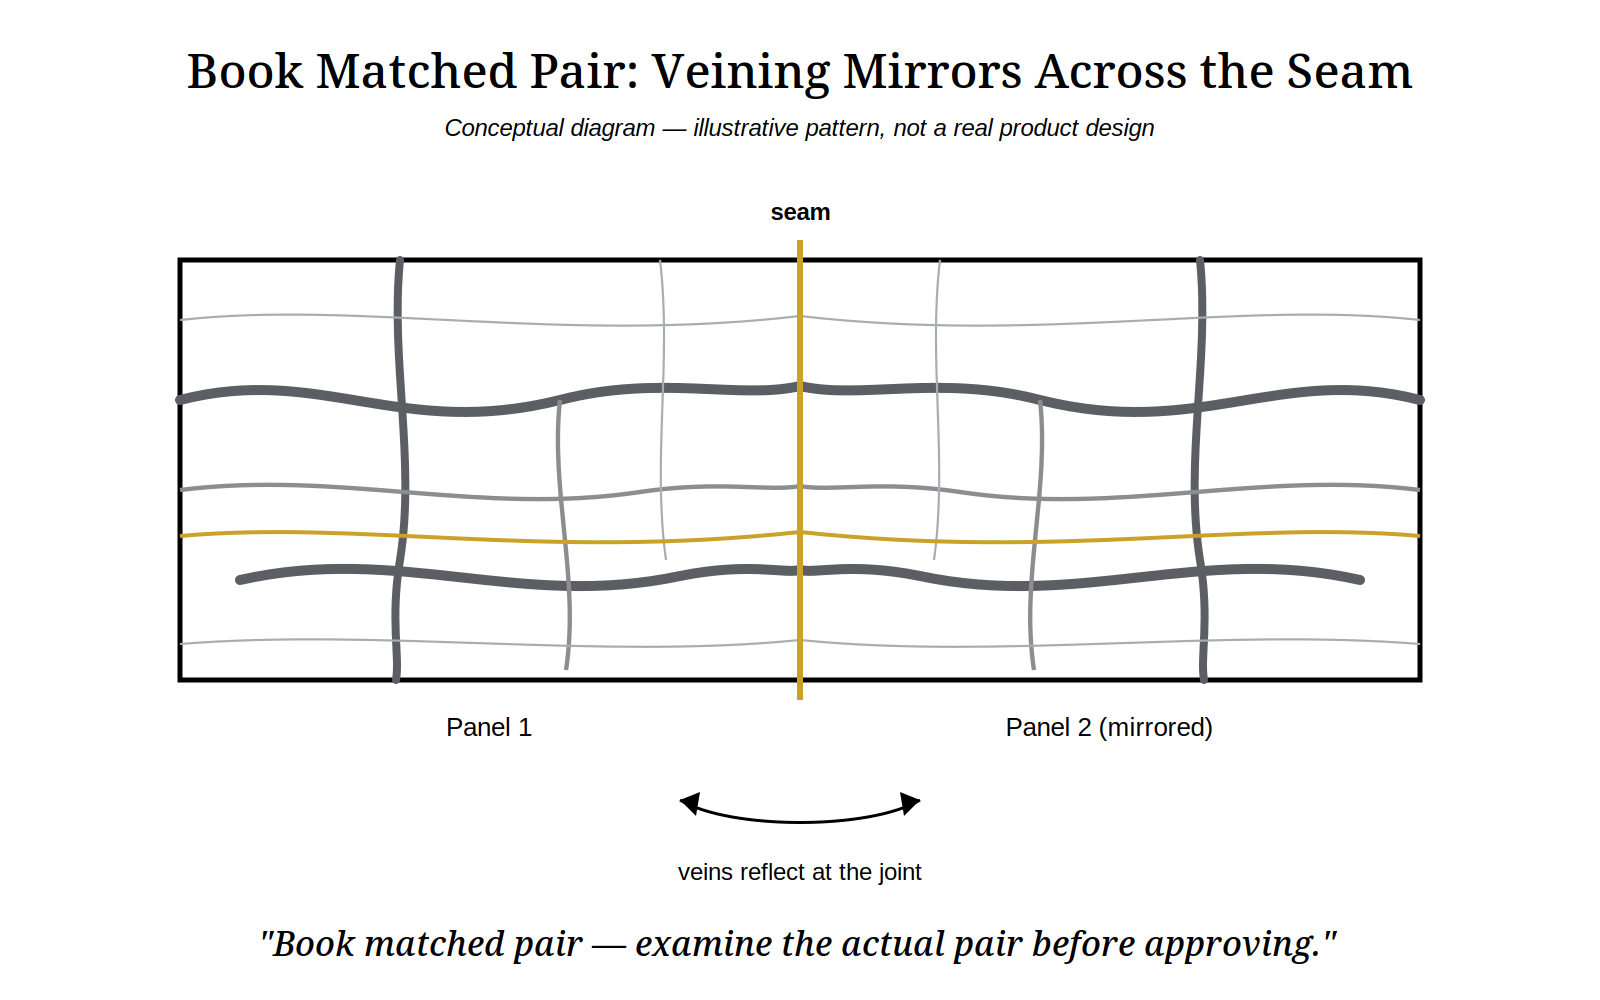
Figure 3-3. A book matched pair mirrors veining across the seam. Examine the actual pair. (Conceptual diagram.)
Let Staff Handle The Slabs
Slabs are heavy, fragile at the edges, and stored on A-frame racking systems that require training to work around. Our staff will pull, position, and return every slab you view. Buyers never move slabs themselves and never enter restricted storage or handling areas. This is for your safety and for the protection of the material.
Take Home Samples
If you want to live with a color reference at home, you may ask our staff about available small take-home samples, subject to availability and current policy. Remember what a sample is: a color and undertone reference for comparing against your cabinets and flooring in your own light. It is not a substitute for the full slab judgments in Worksheet 2.
Worksheet 4: Showroom Visit and Full Slab Observations
Before and During Your Showroom Visit
- Brought cabinet, paint, and flooring samples
- Brought approximate dimensions and application list
- Brought saved product names, SKUs, and page URLs
- Viewed shortlisted slabs from ten or more feet back
- Compared slabs up close against cabinet and flooring samples
- Viewed slabs in natural daylight, not only warehouse lighting
- Compared at least two slabs of the chosen design for variation
- If book matching: examined the actual pair together, in sequence
- Asked staff about available take-home samples
- Recorded exact slab numbers of the slabs viewed
Compare the Slabs You Viewed
For each slab you seriously consider, note the following:
- Slab number
- Background tone in daylight
- Undertone against my cabinet sample
- Vein scale and distribution
- Directional pattern and orientation
- Finish, confirmed for this SKU
- Visual condition notes
- Overall preference ranking
Use the printable guide to record your answers and compare your selections: Download the See the Full Slab Guide (PDF).
Questions To Confirm Before Choosing Or Buying Slabs
Once you have a chosen design, slow down and confirm the commercial details before money changes hands. Slabs are a significant purchase, and most expensive misunderstandings come from details that were assumed rather than recorded. Ask every question below, and write down every answer in Worksheet 5.
Record The Exact Product Details
- Exact product name and SKU
- Material: engineered quartz, porcelain, or sintered stone
- Slab dimensions and thickness
- Finish, exactly as listed for the SKU
- Available quantity of that design
- Batch or lot number of the slabs you viewed
- Which specific slab numbers you viewed
- Book matching status: is the pair you examined reserved together
- Visual condition of the specific slabs, noted while you look at them
- Current availability and whether more slabs of the same batch can be obtained
- Hold or reservation policy: how long a slab can be held, and under what terms
- Delivery or pickup expectations
- Lead time from purchase to availability for your fabricator
- Warranty terms for the material, and where to find them in writing
Tag The Slab And Photograph The Slab Number
The slab you pick should be the slab you receive. When you select specific slabs, confirm they are tagged or otherwise identified as yours, and photograph each slab number yourself. Keep those photos with your Slab Selection Record. If slabs are ever substituted, you will know, and you will have the record to resolve it.
Your Dimensions Are Approximate Until Your Fabricator Approves Yield
The dimensions you bring to the showroom are approximate countertop dimensions. They are not a slab order. Only your independent fabricator, working from a template of your actual cabinets — either a physical template or professional digital (laser) templating — determines final quantities and whether your layout is feasible from the slabs you selected. Never let an approximate measurement lock you into a slab count. Chapter 5 explains how to get your fabricator involved at the right moment, before purchase commitments become expensive.
Think Through Layout Before You Buy
You do not need a final shop drawing at the selection stage, but you do need to think through the layout questions that affect how many slabs you need and which ones:
- Orientation. Which direction will the pattern run on each piece, especially for directional designs
- Seams. Where seams will likely fall on long runs, and whether you accept their placement
- Waterfall continuity. Whether the pattern continues convincingly from the top over the waterfall edge, and which slab area provides that continuity
- Sink and cooktop positions. Their approximate locations, since cutouts consume material and constrain layout
- Cutout geometry. Undermount, apron, or drop in sinks and their rough sizes, because cutout placement affects yield
- Waste and contingency. Layouts produce offcuts. Discuss with your fabricator how much extra material your layout realistically requires rather than assuming a formula.
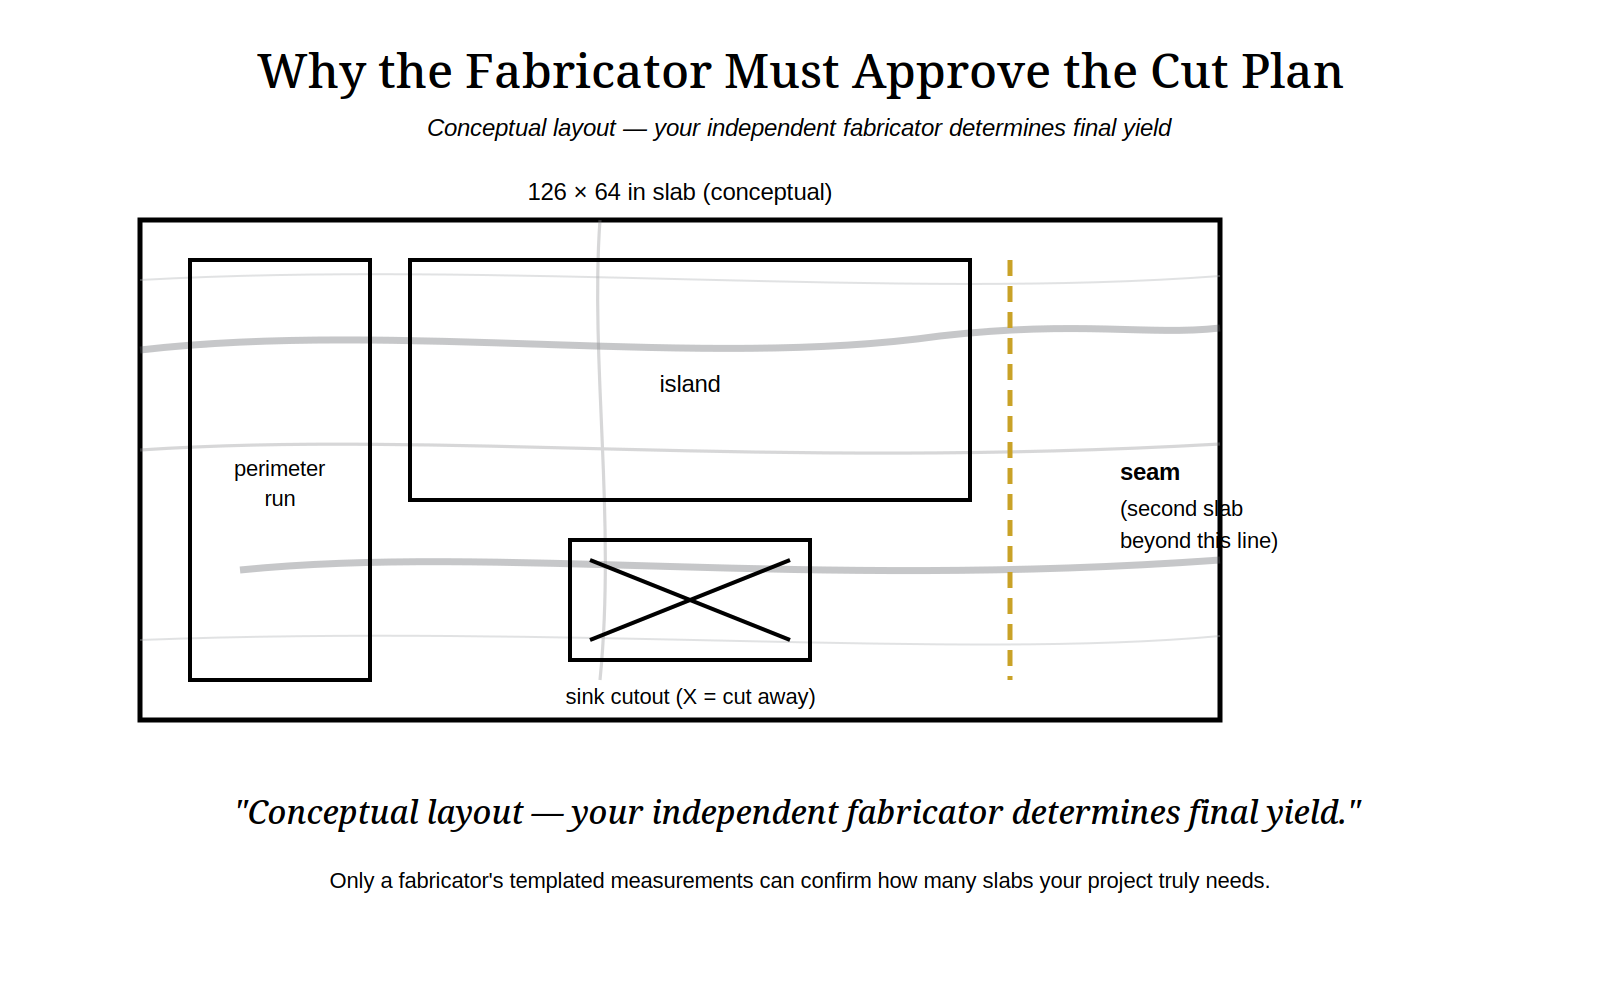
Figure 4-1. Conceptual cut layout. Your independent fabricator determines final slab yield. (Conceptual diagram.)
Worksheet 5: Details to Confirm Before Purchasing
Product identification
- Exact product name
- SKU
- Material
- Slab dimensions
- Thickness
- Finish
Actual slab identification
- Slab numbers viewed
- Batch or lot number
- Book matched pair identified (slab numbers)
- Visual condition notes
Availability and reservation
- Quantity available
- Hold or reservation terms
Logistics
- Delivery or pickup expectations
- Lead time
Documentation
- Warranty terms acknowledged (where documented)
- Staff member spoken with
- Date
Use the printable guide to record your answers and compare your selections: Download the See the Full Slab Guide (PDF).
Qualify Three Or More Independent Fabricators
The slab is the material. The fabricator is the craft. Cutting, edging, polishing, seaming, templating, and installation determine how your project looks and how long it lasts, and the difference between a careful fabricator and a careless one is visible every day for decades. This chapter is the longest in the guide because this decision carries the most weight.
Why Three Or More
One conversation gives you a sales pitch. Two give you a comparison. Three or more give you a market: you will hear how different shops handle your material, what each includes and excludes, how each communicates, and what each charges for the same scope. The time you spend here is repaid in fewer surprises and a measurably better result. Gather names from our Dealer Locator, from your contractor or designer, and from homeowners whose finished work you can see in person.
Fabricators and installers are independent professionals. They are not Verona staff, and we do not direct their work. We supply full slabs only. We do not fabricate, cut, template, or install. Your contract for fabrication and installation is with the fabricator you choose, and your evaluation of that fabricator is your protection.
Qualify Beyond Reviews And Price
Online reviews and the bottom line price are starting points, not qualifications. Evaluate each candidate on:
- Experience with your exact material. Quartz, porcelain, and sintered stone behave differently under the saw. Ask how many projects they have completed in your specific material in the past year.
- Comparable portfolio. Ask to see finished work in your material, at your scale: islands, waterfall edges, full height backsplashes, and shower walls comparable to yours, not just small vanities.
- Location and service area. Confirm they serve your address, and understand how distance affects templating visits, delivery, and any return trips.
- Contractor license where required. Ask for the license number and verify it with the issuing authority where your state or locality requires one.
- Insurance. Ask for proof of general liability coverage, and workers compensation where applicable. This protects your home and everyone in it.
- References. Ask for recent clients with projects like yours, and actually call them. Ask what went wrong and how the shop handled it.
- Communication. Note how promptly and clearly they answer during quoting. Quoting behavior predicts project behavior.
- Written agreements. Insist on written scope, schedule, and terms before any deposit. Verbal promises are not a contract.
- Personnel. Ask who will template, who will fabricate, and who will install. The person you meet may not be the person who does the work.
- Aftercare. Ask what happens if a seam opens, a chip appears, or you have a question six months later.
- Workmanship warranty. Ask what they warrant, for how long, and in writing. This is separate from our material warranty.
- Guarantee on porcelain and sintered stone. Ask whether the fabricator guarantees their work on porcelain and sintered stone specifically. If a slab is damaged at their shop or during transport, who assumes liability? Choose fabricators and installers who back their process and guarantee their work.
Visit The Fabrication Shop
We encourage you to request a scheduled, supervised visit to the actual fabrication shop of any finalist. A fabrication shop is an operating industrial facility: saws running, slabs racked, dust controlled, crews at work. It is not a sales showroom, and the visit serves a different purpose than a showroom visit. In a sales showroom you evaluate designs. In a fabrication shop you evaluate competence: how slabs are stored and handled, how clean and organized the floor is, what equipment is in use, and how the staff talks about your material.
Schedule the visit in advance, follow the shop's safety instructions exactly, stay with your escort, and never enter active cutting areas or approach operating equipment. You are there to observe and ask questions, not to inspect the facility yourself.
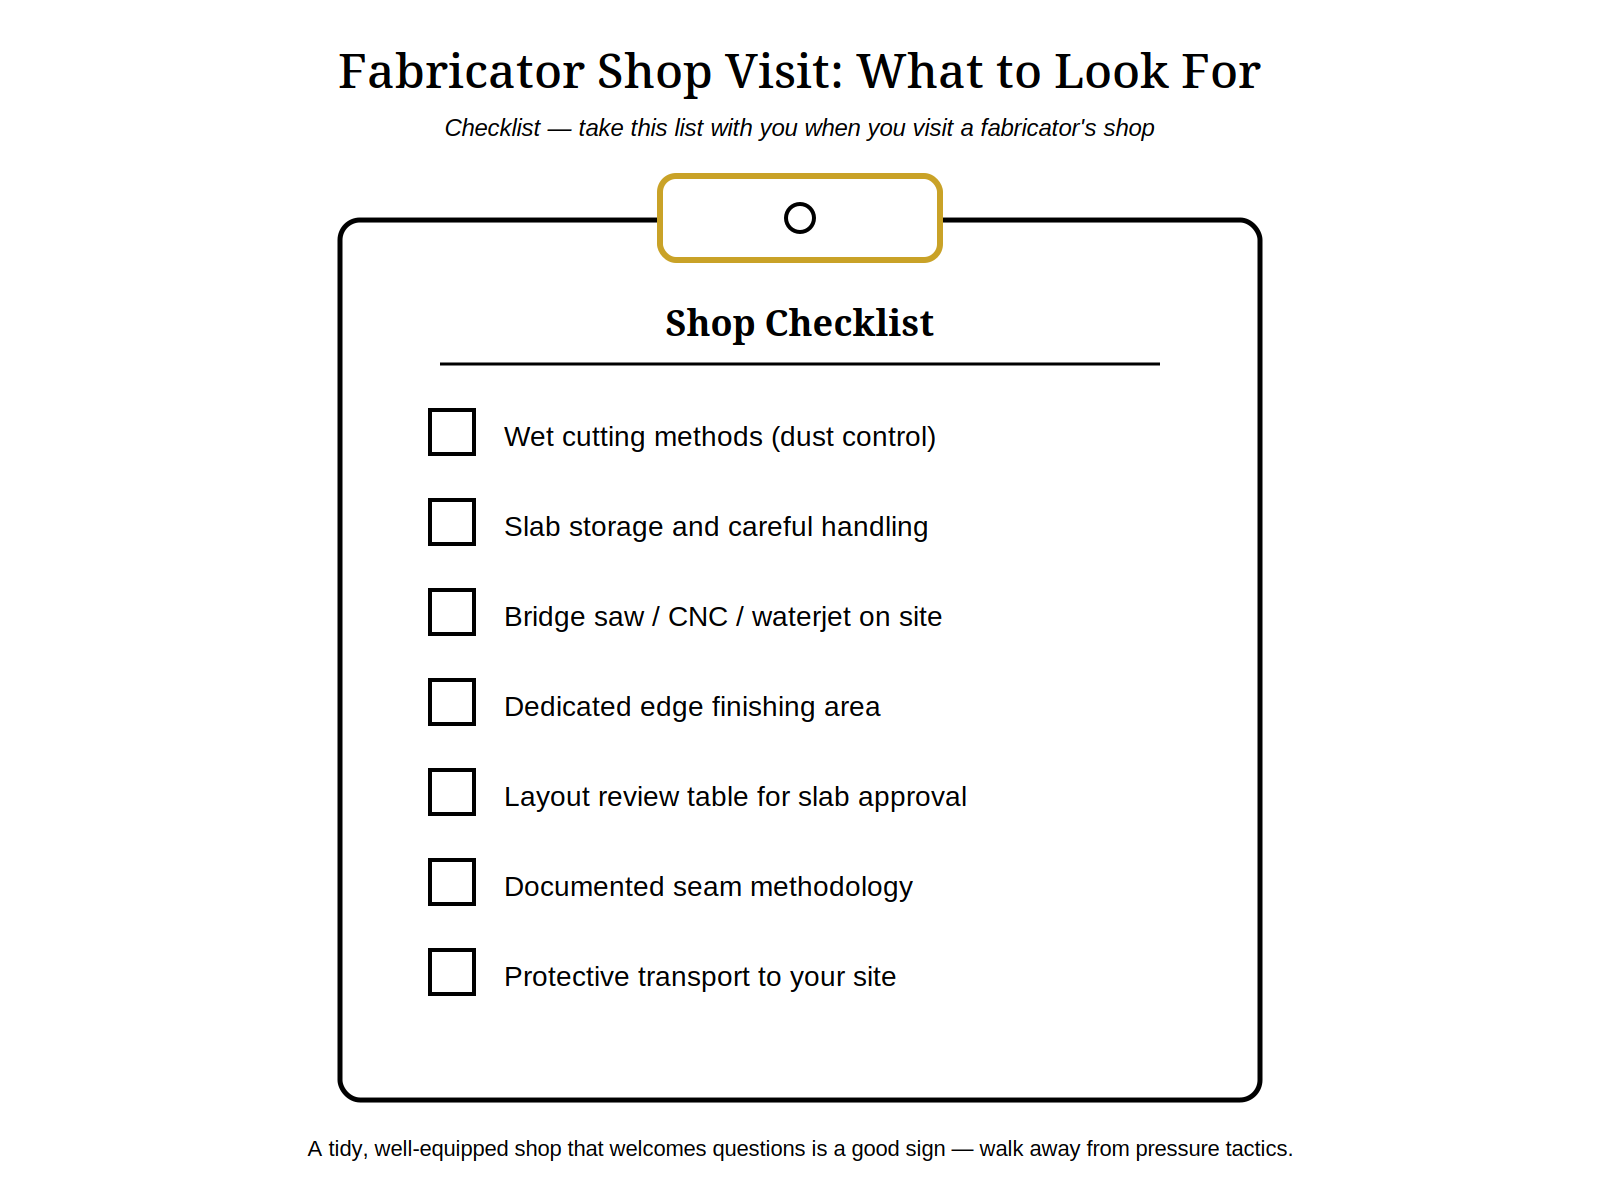
Figure 5-1. What to observe on a scheduled, supervised fabrication shop visit.
Questions To Ask In The Shop
- Slab handling and storage. How are slabs received, stored, and moved? How do you protect edges and faces during handling?
- Layout review. Will you review my slab selection against my layout before cutting, and will I approve the layout drawing showing seam locations and pattern placement?
- Equipment. Do you cut with a bridge saw, CNC, waterjet, or a combination? Which do you use for my material, and why?
- Edge finishing. Which edge profiles do you offer in my material and thickness, and can I see and feel finished samples?
- Sink and cooktop support. How do you support undermount sinks and cooktop cutouts? What reinforcement do you use, and where?
- Seam methodology. Where do you place seams as a rule, how do you join them, and what should I expect a seam to look like in my design?
- Large format competency. For porcelain and sintered panels, what specific equipment and experience do you have with large format material? Can I see a completed large format installation?
- Quality control. What do you check before a piece leaves the shop, and what do you check on site before installation begins?
- Protective transport. How are finished pieces protected and braced during transport to my home?
- Installation sequencing. Walk me through installation day: crew size, hours, what you need from me, and how the pieces are set, leveled, and seamed on site.
Ask About Silica Safety
Cutting and polishing engineered stone, granite, quartzite, and other silica containing materials can generate respirable crystalline silica dust, which is a serious and well documented health hazard when inhaled over time. This is primarily a worker safety matter, and it is also a useful window into how a shop is run. Ask each fabricator about their safety policies and documented OSHA compliance for silica exposure, including dust control and housekeeping practices. We recommend working with fabricators who follow OSHA wet cutting and polishing methods, which suppress dust at the source. Do not enter active cutting areas during your visit, and do not attempt to conduct your own safety inspection of a shop. Ask about policies, listen to the answers, and weigh them alongside everything else. For background on the hazard itself, see the OSHA and NIOSH resources listed in our Sources section.
Red Flags
- No interest in which exact material you selected, or vague answers about material specific experience
- Reluctance to show a portfolio of comparable finished work
- No contractor license where one is required, or no proof of insurance
- Refusal to provide references, or references that cannot be reached
- Unwillingness to schedule a supervised shop visit
- Dismissive or evasive answers about dust control and safety policies
- Quotes given only verbally, or pressure to sign and deposit immediately
- A price dramatically below the others with no clear explanation of what is excluded
- No written workmanship warranty, or a warranty with no stated duration
Worksheet 6: Questions to Ask Before Hiring a Fabricator
Work through the questions below with each candidate during or immediately after each interview.
- What is the company name and contact, and does it serve my address?
- How many projects has it completed in my exact material in the past year, and have I reviewed comparable completed work?
- Is its contractor license (where required) verified, is insurance documented, and have I contacted references?
- Have I completed a supervised shop visit, and what did I observe?
- What cutting equipment does it use for my material — bridge saw, CNC, waterjet, or a combination — and what large-format porcelain or sintered experience does it have, if applicable?
- How does it explain seam placement and finishing, and sink and cooktop support and reinforcement?
- What are its silica safety policies, and does it follow OSHA wet cutting and polishing methods?
- Has it offered a written scope, schedule, and terms, with workmanship warranty terms in writing?
- How well does it communicate, and what is my overall impression and ranking?
Use the printable guide to record your answers and compare your selections: Download the See the Full Slab Guide (PDF).
Compare Three Written Fabrication Quotes
With qualified fabricators identified, the next step is documented, comparable pricing. Collect written quotes from at least three of them, built on the same scope, and compare them line by line. This chapter shows you what each quote must contain and how to read what is missing.
Raw Slab Price Is Not The Project Cost
The price of the slab and the price of the finished project are different numbers, and confusing them is one of the most common budgeting mistakes in this process. The slab is material. The project is material plus templating, fabrication, edging, cutouts, reinforcement, seaming, delivery, installation, removal of existing surfaces, plumbing coordination, taxes, and everything else your home requires. Compare installed project costs, not slab prices, and make sure every quote prices the same scope before you compare the totals.
Every Quote Should Document These Fields
- Material: exact product name, SKU, quantity of slabs, and who supplies the slabs
- Layout: seam locations shown on a drawing, or a commitment to provide one for approval
- Dimensions: which measurements the quote is based on, and whether templating is included or separate
- Edge profile: the exact profile name and which edges receive it
- Waterfall edges and full height backsplashes: priced as separate line items with their material included
- Cutouts: each sink, cooktop, and fixture cutout listed individually
- Sink support: the reinforcement method for undermount sinks, stated explicitly
- Templating: included, with the number of site visits stated
- Corners and reinforcement: inside corners, narrow strips, and any required reinforcement
- Removal and disposal: of existing countertops, if applicable
- Delivery: transport of finished pieces to your home, with protection described
- Installation: setting, leveling, seaming, and cleanup on site
- Taxes, travel charges, and permit costs where applicable
- Lead times: templating to fabrication, fabrication to installation
- Deposit terms: amount, timing, and refund conditions
- Change policy: how changes after approval are priced
- Exclusions: everything not included, listed explicitly rather than left unsaid
- Damage responsibility: who bears the cost if a piece breaks during fabrication, transport, or installation
- Warranties: workmanship warranty terms in writing, separate from our material warranty
How A Lower Quote Can Omit Costly Items
A quote that comes in well below the others is not necessarily a bargain. It is often a narrower scope. Common omissions that turn a low quote expensive later include:
- Templating billed separately after you have committed
- Cutouts priced per opening, with only one or two included in the base price
- Sink reinforcement or support hardware excluded
- Waterfall edges or full height backsplashes quoted without their material
- Removal and disposal of existing tops left out
- Seams placed for the shop's convenience rather than your approval, with no layout drawing
- Delivery beyond a limited radius charged extra
- No written workmanship warranty, which has a real value you will miss only when you need it
- A miscalculated or missed slab count. If the fabricator only realizes they need extra material after cutting has started, the price can change drastically. That is why it pays to use this guide and triple-check your slab count before locking in a fabricator price.
None of these omissions is automatically improper. What matters is that you see them before you choose, not after the deposit is paid.
Mark Every Line Included, Excluded, Or Clarify
Use Worksheet 7 to compare your three quotes side by side. For every line item, mark each quote as Included, Excluded, or Clarify, and write the quoted figure or term beside it. Any row where the three quotes do not match is a question to take back to the fabricators before you decide. Apples to apples is not a figure of speech here; it is the entire method.
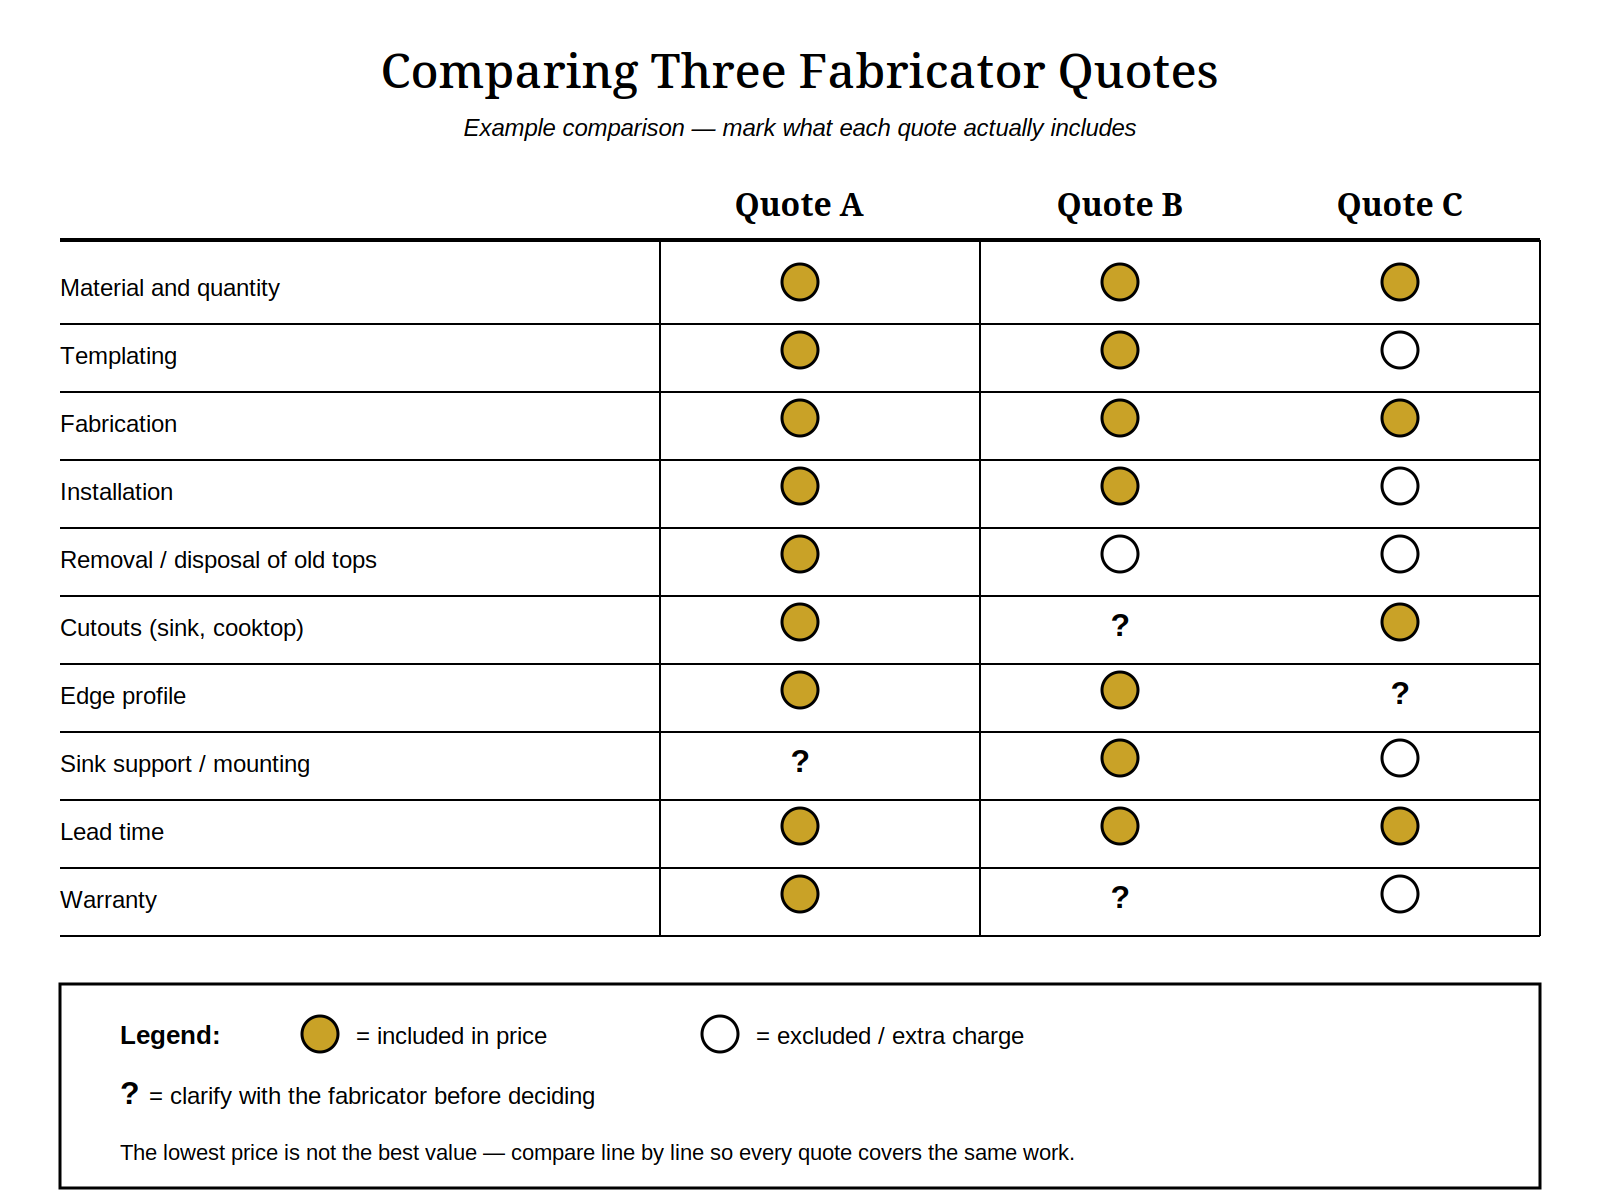
Figure 6-1. Compare quotes by inclusion, exclusion, and items to clarify — not by the bottom line alone.
Worksheet 7: What to Compare in Every Fabrication Quote
For each line item, mark every quote Included, Excluded, or Clarify, and note the figure or term.
Material selection, slab quantity, and who supplies the slabs
- Exact product name, SKU, and slab quantity
- Who supplies the slabs
Layout drawings, templating, seam locations, and final dimensions
- Layout drawing with seam locations
- Templating, including number of site visits
Edge profiles, waterfall details, and full height backsplashes
- Edge profile, by name, on which edges
- Waterfall edges, material included
- Full height backsplash, material included
Sink, cooktop, and other cutouts, including reinforcement and support
- Sink cutouts, each listed
- Cooktop and fixture cutouts, each listed
- Undermount sink support and reinforcement
- Inside corners and narrow strip reinforcement
Removal, disposal, delivery, installation, and cleanup
- Removal and disposal of existing tops
- Delivery with protection described
- Installation: setting, leveling, seaming, cleanup
Taxes, permits, travel charges, and scheduling
- Taxes, travel, and permit costs
- Lead times, templating to installation
Deposits, changes, exclusions, and damage responsibility
- Deposit amount, timing, and refund conditions
- Change policy after approval
- Exclusions listed explicitly
- Damage responsibility during fabrication, transport, installation
Warranty terms and the total installed project cost
- Workmanship warranty in writing
- Total installed project cost, same scope
The complete comparison worksheet is available in the downloadable PDF: Download the See the Full Slab Guide (PDF).
From Slab Selection To Purchase And Installation
You have chosen the material, evaluated the full slab, inspected actual slabs, confirmed the product details, qualified fabricators, and compared written quotes. This final chapter puts those decisions in their responsible order, assigns each job to its owner, and gives you the last checklist before anyone cuts stone.
The Responsible Sequence
- Choose the design. Material first, then the full slab image and gallery, then the showroom visit.
- Record the slabs. Complete your Slab Selection Record with exact slab numbers, batch, and hold terms.
- Consult your fabricator. Bring your selection and approximate dimensions to your chosen fabricator before final purchase commitments, so yield and feasibility are confirmed by the people doing the work.
- Confirm cabinet and site readiness. Cabinets set, level, and secured; the site prepared per your fabricator's requirements.
- Templating. Your fabricator templates the actual installed cabinets — either with a physical template or with professional digital (laser) templating. Nothing is cut from approximate dimensions.
- Layout approval. You approve the layout drawing: seam locations, pattern placement and orientation, waterfall continuity, and every cutout position.
- Pickup or delivery of slabs. Your purchased slabs move to the fabricator under agreed terms.
- Fabrication. Cutting, edging, polishing, and quality control at the shop.
- Installation. Setting, leveling, and seaming on site.
- Final inspection. You walk the finished work against your approved layout and quote before final payment.
Who Is Responsible For What
| Task | Verona Quartz Surfaces | Independent Fabricator And Installer | Cabinet Contractor | Plumber | Homeowner |
|---|---|---|---|---|---|
| Supply full slabs | Yes | ||||
| Material warranty under stated terms | Yes | ||||
| Confirm slab yield and layout feasibility | Yes | ||||
| Templating | Yes | ||||
| Fabrication: cutting, edging, polishing | Yes | ||||
| Seam placement and execution | Yes | ||||
| Sink and cooktop cutouts and support | Yes | ||||
| Installation, leveling, and seaming on site | Yes | ||||
| Workmanship warranty | Yes | ||||
| Cabinets set, level, and secured | Yes | ||||
| Plumbing disconnect and reconnect | Yes | ||||
| Selections and approvals | Yes | ||||
| Final inspection sign off | Yes |
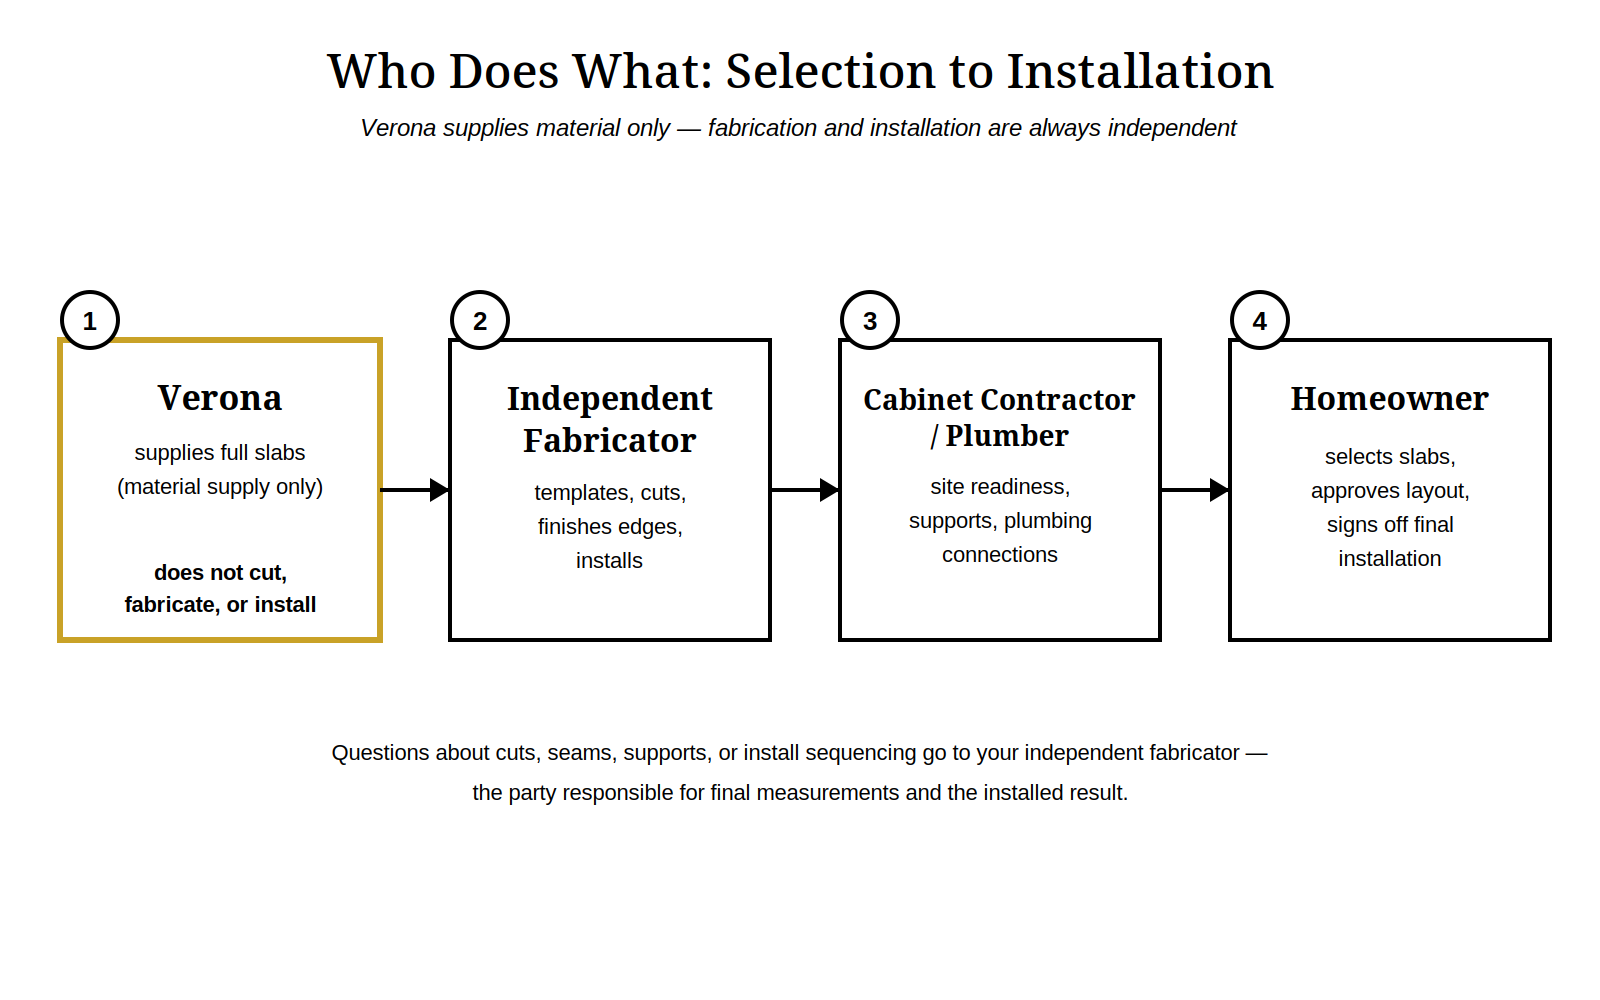
Figure 7-1. Who does what: Verona supplies full slabs; independent professionals handle the rest.
For Installation Detail, Use Our Installation Readiness Guide
This guide ends where installation begins. For the installation phase itself, including site readiness, sequencing, and what to expect on installation day, our Installation Readiness Guide covers it in full. We keep the detail there so each guide does one job well.
Worksheet 8: Final Project Approval Checklist
Complete the pre purchase section before slabs are purchased, and the layout approval section before any slab is cut.
Before Purchasing Slabs
- Slab numbers match my Slab Selection Record
- Batch or lot confirmed for all slabs
- Book matched pair reserved together, if applicable
- Hold or reservation terms understood
- Fabricator has reviewed my selection against my layout
- Slab quantity confirmed by the fabricator, not by my estimate
- Written fabrication quote signed, scope complete
- Deposit terms and refund conditions understood
- Delivery or pickup date for slabs agreed
Before Fabrication Begins
- Cabinets set, level, and secured
- Templating completed from actual cabinets
- Layout drawing approved: seam locations
- Layout drawing approved: pattern placement and orientation
- Layout drawing approved: waterfall continuity
- Layout drawing approved: every cutout position
- Edge profile confirmed by name
- Sink and cooktop models confirmed with the fabricator
- Installation date scheduled
- Workmanship warranty received in writing
- Material warranty terms on file
Use the printable guide to record your answers and compare your selections: Download the See the Full Slab Guide (PDF).
Start Your Project With Us
Begin on Find Your Stone to browse our designs by material and look, use our Dealer Locator to find where to view and purchase slabs, and reach out through our Contact page to schedule a showroom appointment. We are at 9415 Telfair Avenue, Sun Valley, California 91352, and you can reach us at +1-818-962-3668. We look forward to helping you see the full slab.
Frequently Asked Questions
Why Should I View The Full Slab Instead Of Choosing From A Sample?
A sample shows you color. Only the full slab shows you scale: how large the veins grow, where movement clusters, whether the pattern has a direction, and how much of the surface is quiet background. Chapter 2 explains how to read a full slab image element by element.
Where Do I Find Installed Examples On A Verona Product Page?
On every veronaquartz.com product page, the full slab image is shown first, and real installed project photos follow in that product's image gallery. Scroll or click through the gallery to see the design in finished spaces. Galleries vary by product, and not every design has installed photos.
What Are The Limits Of A Small Sample?
A sample is a reliable color and undertone reference for comparing against your cabinets and flooring in your own light. It cannot show vein scale, distribution, movement, or directional pattern at full size. Never approve scale or movement from a sample.
How Do Undertones And Lighting Affect What I See?
Undertones decide whether a slab harmonizes with your room or fights it, and lighting changes which undertone you perceive. View slabs in natural daylight as well as warehouse lighting, hold your real cabinet and flooring samples directly against the slab, and compare gallery photos taken in different light.
What Is Book Matching And Should I Ask For It?
Book matching pairs two consecutive slabs so the veining mirrors along a shared edge, opening like the pages of a book. It suits symmetrical feature areas such as waterfall islands and full height backsplashes. If it matters to your layout, examine the actual pair together, in sequence, before approving.
Why Do Slabs Of The Same Design Look Different From Each Other?
Natural looking designs vary from slab to slab in vein distribution, scale, and background tone. Compare at least two slabs of your chosen design, note the batch or lot number, and select and photograph your exact slab numbers so the slab you pick is the slab you receive.
How Do I Choose A Fabricator?
Get information from at least three independent fabricators and qualify them on experience with your exact material, a comparable portfolio, license where required, insurance, references, communication, written agreements, aftercare, and a written workmanship warranty. Chapter 5 gives the full method.
Why Does A Shop Visit Matter?
A scheduled, supervised visit to the operating fabrication shop shows you how slabs are stored and handled, what equipment is used, how the floor is run, and how the staff talks about your material. A sales showroom shows you designs; a fabrication shop shows you competence. Stay with your escort and never enter active cutting areas.
What Should A Fabrication Quote Include, And What Do Exclusions Mean?
A complete quote documents material, layout and seams, templating, edge profile, waterfall and backsplash work, every cutout, sink support, removal and disposal, delivery, installation, taxes and fees, lead times, deposit terms, change policy, damage responsibility, warranties, and explicit exclusions. A lower total often reflects a narrower scope, so compare line by line using Worksheet 7 before comparing totals.
Who Is Responsible For Seams And Cutouts?
Your independent fabricator and installer: seam placement and execution, sink and cooktop cutouts, and their support and reinforcement are fabrication work. You approve the layout drawing showing seam locations and every cutout position before any slab is cut.
How Many Slabs Will My Project Need?
Your approximate dimensions produce an estimate, not an order. Only your fabricator, working from a template of your actual cabinets — either a physical template or professional digital (laser) templating — and an approved layout, determines final slab quantities and feasibility. Confirm yield with your fabricator before final purchase commitments.
What Is The Difference Between A Material Warranty And A Workmanship Warranty?
Our material warranty covers the slab material itself under its stated terms: lifetime residential for quartz, 25 years for porcelain and sintered stone. It does not cover cutting, edging, seaming, or installation. Those are covered, if at all, by your fabricator's separate written workmanship warranty.
Does Verona Install Countertops?
No. We supply full slabs only. We do not fabricate, cut, template, or install. Fabrication and installation are performed by independent qualified fabricators and installers that you select.
What Must Be Approved Before Any Slab Is Cut?
The layout drawing showing seam locations, pattern placement and orientation, waterfall continuity, and every cutout position; the edge profile by name; the sink and cooktop models; and the signed written quote. Worksheet 8 collects every approval in one place.
Sources
The guidance in this guide rests on the following official sources. Consult them directly for the full text behind any summary here.
- OSHA Respirable Crystalline Silica standards: 29 CFR 1910.1053 (General Industry) and 29 CFR 1926.1153 (Construction) — permissible exposure limits and required exposure control methods
- NIOSH Publication No. 2002-129, Health Effects of Occupational Exposure to Respirable Crystalline Silica — hazard review and recommended exposure limit
- Verona Quartz Surfaces Installation Readiness Guide, for site readiness, installation sequencing, and post installation care
Verona Quartz Surfaces, 9415 Telfair Avenue, Sun Valley, California 91352, 818 962 3668, veronaquartz.com
Continue Exploring
View Quartz SurfacesView Porcelain SurfacesView Sintered StoneVisit Our ShowroomContact Verona