


Countertop Planning & Installation Readiness Guide
Choose the right surface for the way the room will be used. Then close every cabinet, sink, support, slab, and layout decision before cutting begins.
Download the Installation Readiness Guide PDF
Installation Guidelines · Frequently Asked Questions
On This Page
|
|
The Correct Sequence
Do Not Template A Project That Is Still Changing
Countertop projects fail when stages overlap. Do not template a project that is still changing. A template turns the room into fabrication data. A moved island, a revised sink, a different cooktop, or a late edge change can invalidate that data and force a new template, a recut, or another slab. Control the order below and do not approve the next stage while the previous stage is still moving.
Cabinets Complete — Cabinet boxes and islands are permanently fastened. Finished panels, fillers, scribes, and final appliance positions are set.
Pick Out Slabs — Reserve your exact slabs. Bring your final cabinet sample, flooring selection, hardware, and room photos to compare against full slabs at our showroom.
Template — Your fabricator records exact field measurements only after the room stops changing.
Slab And Layout Approval — Approve vein direction, seam locations, cutouts, edge profile, and the full slab map in writing before anything is cut.
Fabrication — The shop cuts, edges, and finishes your pieces from the approved layout.
Countertop Installation — The crew sets the stone on cabinets that are already level, true, and ready.
Plumbing And Appliance Reconnection — Licensed trades reconnect the sink, faucet, disposal, gas, and electrical.
Backsplash And Final Touchups — The backsplash goes in after the counters. Paint and drywall touchups close the project.
Before Template
Choose the material around actual heat, sun, edge, and cleaning conditions.
Fix cabinets, panels, fillers, appliance locations, and island position.
Have the exact sink and appliance data available.
Approve the support approach for overhangs, sinks, and thin slab edges.
Before Cutting
Reserve the exact slabs and record thickness, finish, lot, and sequence.
Approve vein direction, seams, cutouts, edge profile, and backsplash scope.
Confirm the fabricated pieces can reach the room.
Keep one written release sheet signed by the decision maker.
The Controlling Rule. Do not approve the next stage while the previous stage is still moving.
Where We Stop. We supply the slab and help you compare materials. The independent qualified fabricator and installer must verify every site measurement, cut, support condition, and installation detail before work begins.
Choose By Use
Color Comes After Performance
Start With The Room, Not The Pattern. Quartz, porcelain, and sintered stone can all deliver a premium surface. They are not interchangeable. The correct choice depends on exposure, heat, edge design, thickness, and the fabricator who will execute the work.
Best fit
Quartz: Indoor kitchens and baths with familiar fabrication and broad edge options.
Porcelain: Indoor or outdoor counters, walls, fireplaces, and thin profile design.
Sintered stone: Demanding indoor or outdoor counters with strong heat and UV requirements.
Direct sun
Quartz: Covered use only. Avoid direct sunlight.
Porcelain: Suitable for exterior use on our product pages.
Sintered stone: UV stable and intended for exterior use.
Heat strategy
Quartz: Use trivets. Resin makes extreme heat a risk.
Porcelain: High heat tolerance. Confirm details for the exact product and assembly.
Sintered stone: High heat tolerance from a resin free mineral body. Confirm the exact product.
Typical listed format
Quartz: 126 by 64 inches, 20 mm. We also offer 138 by 79 inch super jumbo quartz in selected stock.
Porcelain: 126 by 64 inches, 12 mm.
Sintered stone: 126 by 64 inches, commonly 12 mm or 20 mm depending on product.
Edge planning
Quartz: Solid body supports a broad range of profiles.
Porcelain: Thin body often uses a precision miter for a thicker look.
Sintered stone: 12 mm often uses miters. 20 mm can support more traditional profiles.
Fabrication
Quartz: Qualified quartz fabricator.
Porcelain: Specialist handling, wet continuous rim diamond tooling, precise miters.
Sintered stone: Specialist diamond tooling, waterjet or computer controlled cutting where needed.
Do not select from this comparison alone. Confirm the exact product page, slab thickness, finish, warranty, and approved application before purchase. Product availability and specifications can vary by design.
Quartz
The Direct Indoor Choice
Quartz is the practical route when the project is indoors, the edge profile matters, and the household wants a nonporous surface that never needs sealing.
Use It When
The counter is indoors and away from prolonged direct sun.
You want a traditional polished edge, rounded profile, or built up edge detail.
You prefer simple daily cleaning with mild soap, water, and a soft cloth.
You need a broad range of marble inspired and solid color options.
Control These Risks
Quartz is heat resistant, not heat proof. 300 degrees is the maximum before discoloration. Use a trivet or hot pad, and never set a pan straight from the oven on the surface.
Do not use quartz for direct outdoor sun unless the exact product is approved for that condition.
Never cut directly on the surface.
Do not add sealer or polish. It is unnecessary and can create an uneven finish.
Know The Standard Listed Spec
Slab: 126 by 64 inches on current quartz product pages.
Thickness: 20 mm, also stated as 2 cm.
Finish: Semi polished on the reviewed product pages.
Super jumbo is a yield tool. Our super jumbo quartz offering measures 138 by 79 inches. Confirm that size against the exact selected stock before the fabricator plans a one piece island.
Homeowner Decision. Choose quartz when a protected indoor location, flexible edge design, and simple maintenance matter more than direct sun or extreme heat performance.
Porcelain
Thin Profile, Broad Application
Our porcelain is listed for interior and exterior surfaces. Its 12 mm body suits counters, full height backsplashes, shower walls, fireplaces, and cladding where a lighter visual profile is part of the design.
Use It When
The project includes outdoor exposure or strong sunlight.
Heat resistance is a primary selection factor.
The design needs large wall panels or a slim edge.
A mitered edge or waterfall can be fabricated by a qualified specialist.
Control These Details
Thin slabs need deliberate support, transport, and jobsite handling.
A thicker visual edge usually requires a precise 45 degree miter and a color matched adhesive.
Pattern is printed at the surface, so edge transitions must be planned rather than assumed.
Cutouts require correct wet tooling and an experienced porcelain fabricator.
Our Porcelain Advantage. Our 12 mm porcelain does not require perimeter tension relief cuts or sealing. More of the slab can remain usable, but the fabricator still needs approved tooling and handling methods.
Listed Spec
Slab: 126 by 64 inches.
Thickness: 12 mm, also stated as 0.5 inch.
Use: Interior and exterior on reviewed product pages.
Sealing: Not required.
Homeowner Decision. Choose porcelain when direct sun, heat, wall coverage, a thin architectural profile, or a surface that never needs sealing matters. Confirm the project with an independent fabricator experienced in large format porcelain.
Sintered Stone
Resin Free Performance
Sintered stone is formed from mineral powders under pressure and kiln heat. It contains no resin binder, remains stable in direct sun, and is intended for high performance indoor and outdoor work.
Use It When
The counter is outdoors or receives prolonged direct sun.
The design includes a fireplace surround or a heat intensive cooking zone.
Near zero porosity and no sealing are priorities.
The project needs a matte, natural, soft, silk, or polished visual direction, subject to product availability.
Control These Details
Dense mineral construction requires specialist diamond tooling and careful fabrication.
Match thickness to the edge, sink, support, and outdoor assembly.
Plan miters, cutouts, and handling before the slab is released.
Do not treat a general heat statement as permission to ignore the exact product and installation instructions.
Why Thickness Matters. We specify 12 mm slabs for counters and full height backsplashes, while 20 mm slabs support heavier outdoor work, traditional edge profiles, and more complex sink conditions.
Listed Spec
Slab: 126 by 64 inches on reviewed products.
Thickness: 12 mm and 20 mm across the collection.
Use: Interior and exterior.
Homeowner Decision. Choose sintered stone when exterior exposure, UV stability, resin free construction, and strong heat performance outweigh the need for conventional quartz fabrication.
Cabinets And Template
The Slab Follows The Base
Cabinets Control The Quality Of The Install. The cabinet run must be permanent, stable, and accurate before the fabricator records the template. We require cabinet tops to be flat and true within 1/16 inch across 18 inches.
Check flatness across 18 inches. Provide front to back support every 18 to 24 inches.
Close These Conditions
Cabinet boxes and islands are permanently fastened.
Finished panels, skins, fillers, scribes, and decorative legs are installed.
Walls are at the final measurable plane.
Overhang support is approved before fabrication.
Doorways, stairs, turns, elevators, and staging space are checked.
Have These Items On Site
The exact sink and drain position.
Cooktop model and cutout drawing.
Faucet, air switch, soap dispenser, and filtered water details.
Appliance panels and final appliance clearances.
Approved support rails or sink setter system.
Do not force stone to correct cabinetry. Fix a low, twisted, or moving base first. The countertop should arrive to a structure that is already ready to receive it.
Site Approval Belongs To The Installer. We can help you choose quartz, porcelain, or sintered stone and reserve the slabs. We do not take field dimensions or determine site support. Your independent qualified fabricator and installer must approve the cabinets, template, access, support, and final installation method.
Slab Yield And Layout
Area Is Only The First Number
Buy For Slab Yield, Not Square Footage. The fabricator must fit each piece inside the usable slab while protecting vein direction, cutout strength, edge buildup, seam logic, and safe handling. A quote can have the correct area and still have the wrong slab count.
Record The Exact Slab
Product name and stock keeping unit.
Actual dimensions and thickness.
Finish, lot, and slab sequence.
Number of slabs reserved.
Book matched order when selected.
Any visible area that must be excluded.
Approve The Visible Plan
Vein direction across island, perimeter, backsplash, and waterfall.
Seam location and pattern alignment.
Sink and cooktop position within the pattern.
Edge buildup, overhangs, and finished ends.
Every piece labeled on a photo or digital slab map.
Approval Standard. The person paying for the work and the person cutting the slab should approve the same visual map. Keep that approval with the project record.
Fabrication And Support
Details Carry The Load
Cutouts, Edges, And Support Need Written Dimensions.
Our Quartz Fabrication Baseline
Inside corners: minimum 3/8 inch radius at sinks, cooktops, and shaped tops.
Cutout clearance: an extra 1/8 inch between the fixture and cutout edge.
Edge: minimum 1/8 inch bevel. We prefer a 1/8 inch pencil round.
Cutting: wet diamond tools. Start cutouts with a core bit and avoid cross cutting.
Polishing: wet polish edge details only. Do not polish the factory face.
Support The Surface
Provide perimeter support with a full deck where specified.
Provide front to back support every 18 to 24 inches.
Have the fabricator specify support for every overhang.
Support every sink independently from the countertop.
Fasten Without Stress
For quartz, use dabs of flexible 100 percent silicone spaced 8 to 12 inches apart.
Never drive nails or screws into quartz.
Groove seam edges for adhesive and use a compatible pigment match.
Place extra adhesive at corners and joints as required by the fabrication plan.
Material changes the fabrication method. These dimensions are our quartz guidance. Porcelain and sintered stone need product specific cutting, edge, and support details from a fabricator qualified for that material.
Choose A Fabricator Who Controls Silica Dust
OSHA and the National Institute for Occupational Safety and Health identify respirable crystalline silica as a countertop fabrication hazard. Ask whether the shop follows the applicable silica standard, uses wet cutting and wet polishing at the point of contact, adds local exhaust when needed, and avoids uncontrolled dry cutting or grinding.
A code minded fabricator should also be able to explain its exposure assessment, written control plan, wet or high efficiency particulate air housekeeping, equipment maintenance, training, and respiratory protection when required. That discipline is a useful signal that the work will be planned rather than improvised.
One-Piece L-Shapes
An L-Shaped Corner Is A Stress Decision
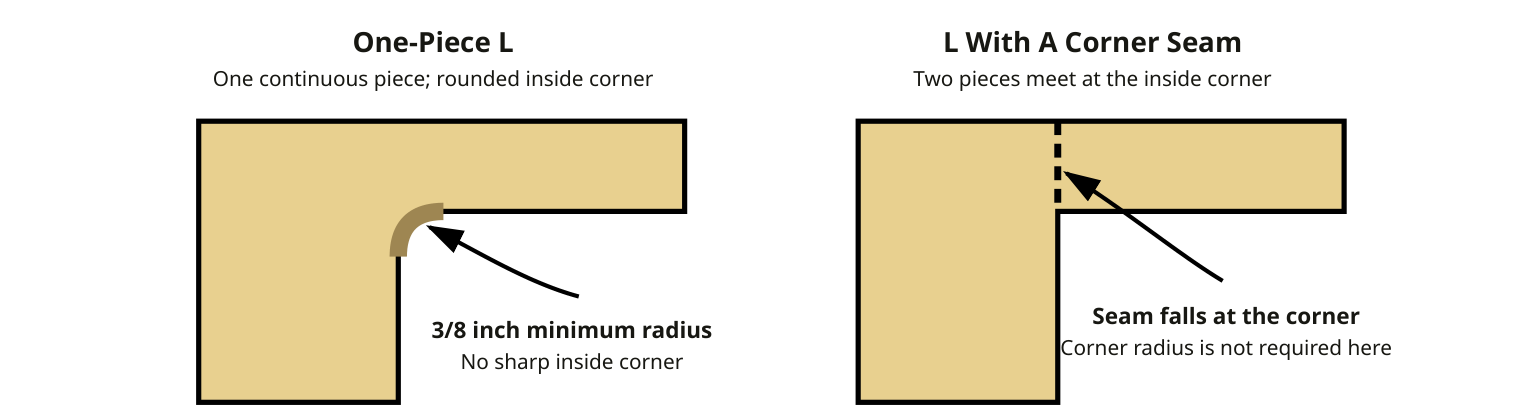
A One-Piece L Is A Conditional Fabrication Choice. A one-piece L removes a corner seam, but it also creates one rigid piece with an inside corner that must survive cutting, handling, transport, and installation. Do not approve it from the short-leg dimension alone.
One continuous piece with a rounded inside corner and a 3/8 inch minimum radius means no sharp inside corner. When two pieces meet at the inside corner, the seam falls at the corner and no corner radius is required there.
A One-Piece L May Be Considered Only When
The full shape fits within the verified usable area of the exact slab.
The inside corner can be formed with a minimum 3/8 inch radius.
The fabricator can core-drill the corner, avoid cross-cutting, and use wet diamond tools without damaging the drilled area.
Sink, cooktop, faucet, and other openings leave enough material around the L corner.
The specified cabinet and substrate support continues through both legs and the corner.
The piece can be transported, turned, carried, and set without twisting or flexing.
A Corner Seam Is Usually The Safer Plan When
The return is a full-depth counter rather than a small or shallow return.
A sink, cooktop, notch, or another stress point is close to the inside corner.
The one-piece geometry creates poor slab yield or forces an unacceptable pattern layout.
Doors, stairs, elevators, turns, or staging make one-piece handling difficult.
The cabinets or support plan cannot provide reliable bearing through the full L.
The fabricator will not accept and warrant the one-piece fabrication and installation plan.
There is no universal short-leg cutoff. Published quartz fabrication manuals do not all use the same rule for one-piece L-shapes. For our quartz, the controlling minimum is a 3/8 inch radius at every unseamed inside corner. A short leg by itself does not make the piece acceptable.
Require A Written Go / No-Go Decision. Before layout approval, ask the independent qualified fabricator and installer to mark the drawing as one piece or seamed, show the radius or seam, confirm nearby cutouts, support, transport path, and installation method, and state that the selected plan is covered by their workmanship warranty. We supply the slab; we do not approve the field fabrication or installation plan.
Flush Mounted Sink
The Sink Is The Highest Impact Cutout
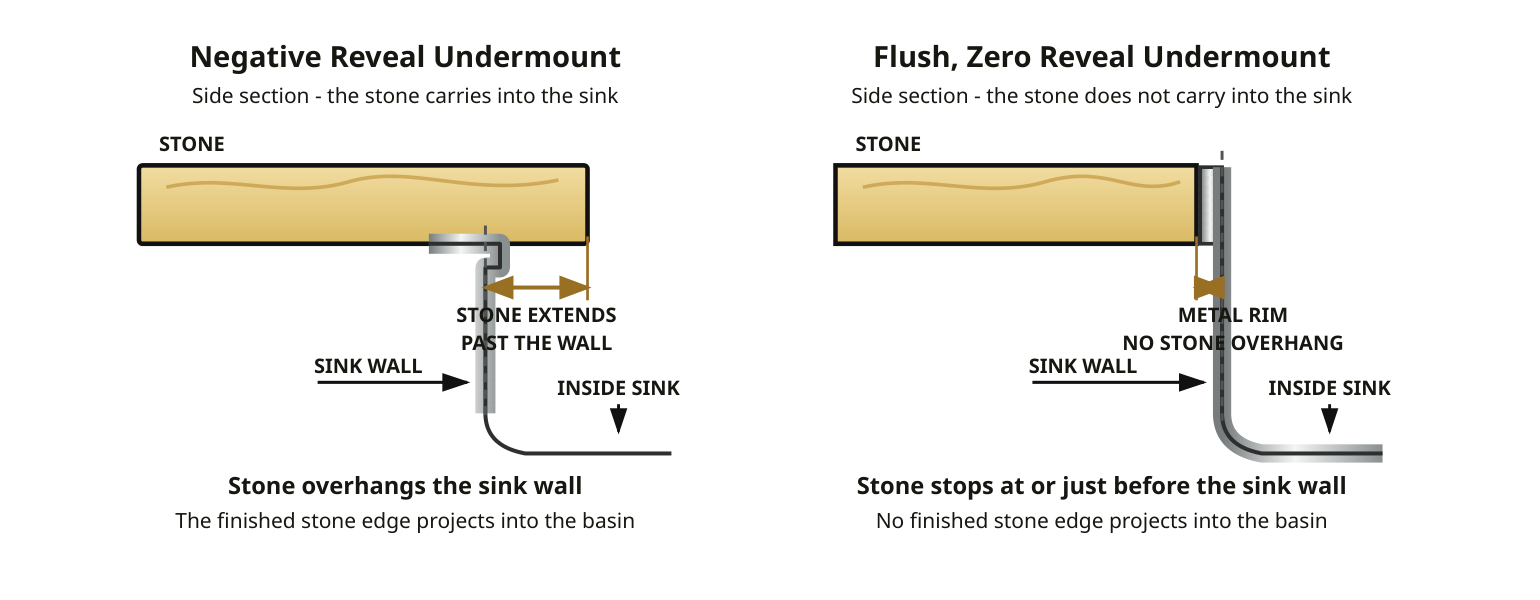
A Flush Mounted Sink Reduces Direct Impact At The Stone Edge. A rectangular undermount sink is standard in many United States kitchens. With a negative reveal, the stone cutout continues past the sink wall and projects into the basin. With a flush, zero reveal, the stone stops just before the sink wall and does not carry into the sink. On a compatible flush mounted sink, the stainless steel rim finishes level with the countertop and helps receive direct impact before the stone edge.
Negative reveal undermount, side section: the stone carries into the sink. The finished stone edge projects into the basin because the stone overhangs the sink wall. Flush, zero reveal undermount, side section: the stone does not carry into the sink. No finished stone edge projects into the basin because the stone stops at or just before the sink wall, with the metal rim and no stone overhang.
Why Flush Mount Helps
The stainless steel flange acts as a bumper around the working edge.
Heavy cookware reaches the metal rim before the finished stone edge.
The stone stops just before the sink wall, so no stone ledge projects into the basin.
The level transition removes the hidden underside created by a negative reveal and makes debris easier to wipe into the basin.
What It Requires
The exact sink must be present before template and fabrication.
The machined recess must match the sink flange depth and outline so the rim finishes level with the countertop.
The sink needs independent mechanical support. The slab must not carry its weight.
The perimeter joint needs compatible 100 percent silicone and periodic inspection.
Flush mounted does not mean chip proof. The visual difference is direct: a negative reveal carries stone into the sink, while a flush, zero reveal stops the stone just before the sink wall. Confirm the rectangular sink model, material, slab thickness, flange geometry, and fabricator before template. The sink must remain independently supported and sealed with 100 percent silicone.
What Must Be Included In My Fabrication Quote?
The Slab Price Is Only One Part Of The Job
Two proposals can show different totals because they are not pricing the same scope. Ask each fabricator to mark every line as included, excluded, or priced as an allowance before you compare bids.
Measurements, Material, And Fabrication
Template / field measurements.
Slab pickup and delivery.
Demolition and removal of existing counters.
Fabrication labor.
Sink cutout.
Sink mounting and independent support.
Faucet and accessory holes.
Cooktop cutout.
Selected edge profile.
Mitered or built-up edges.
Waterfall panels.
Layout, Installation, And Site Conditions
Number and location of seams.
Vein and layout matching.
Brackets or overhang reinforcement.
Full-height slab backsplash fabrication.
Countertop installation.
Jobsite cutting charges, if applicable.
Stairs, elevator, or special access charges.
Plumbing and electrical work, or a clear statement that they are excluded.
Return trips and change-order rates.
Who owns and receives the remaining slab or offcuts.
Ask for quantities, not only labels. A complete proposal should identify the number of sink and cooktop cutouts, faucet holes, seams, finished edges, waterfall legs, backsplashes, brackets, and trips included.
Compare The Same Scope. Before selecting a fabricator, place the proposals side by side and normalize every inclusion, exclusion, allowance, and access charge. The lowest total is not the lowest price if required work appears later as a change order.
Who Is Responsible For What?
Responsibility Must Be Assigned Before Template
A countertop agreement is not automatically a demolition, plumbing, gas, electrical, cabinet, wall repair, or tile contract. Before the room is templated, mark every task as included or excluded, name the responsible trade, and record who will schedule it.
Slab supply — We supply the slabs.
Template / field measurements — Independent fabricator.
Slab cutting and edge fabrication — Independent fabricator.
Countertop installation — Independent fabricator / installer.
Existing countertop demolition — Confirm in the fabrication or general contractor agreement.
Sink mounting — Typically the fabricator / installer; confirm support and sealing in the contract.
Faucet, sink drain, and garbage disposal plumbing — Licensed plumber or other appropriate trade.
Gas cooktop connection — Appropriate licensed trade.
Electrical connections — Licensed electrician or other appropriate trade.
Overhang brackets or structural supports — Cabinet contractor, general contractor, or fabricator / installer, as contracted; approve before template.
Cabinet leveling or structural repair — Cabinet contractor / general contractor.
Drywall or wall patching — General contractor or drywall trade; confirm separately.
Tile backsplash — Tile contractor, unless the fabricator's contract includes it and the fabricator holds the required tile installation license or certification.
Full-height slab backsplash — Independent fabricator, if included in the contract.
Read the exclusions, not only the proposal total. Scope and licensing requirements vary. Ask each contractor to identify disconnections, reconnections, demolition, hauling, support, repairs, and finish work in writing before work begins.
Our Role. We supply quartz, porcelain, and sintered stone slabs and help you compare surface options. We do not take field measurements, fabricate, install, or coordinate trade work. The independent professionals you hire must confirm their own scope, licensing, and site responsibilities.
Installation And Care
No Design Decisions On Installation Day
The Crew Should Arrive To An Approved Room.
Before Arrival
Clear the route from truck to room.
Protect floors, cabinetry, and adjacent finishes.
Remove drawers or obstacles requested by the installer.
Coordinate water, gas, and power with the proper trades.
Keep other crews out of the work zone.
Before Signoff
Compare each piece with the approved slab map.
Review seams and pattern alignment in consistent light.
Inspect edges, inside corners, cutouts, and wall clearance.
Confirm sink support and seal.
Photograph every open item before the crew leaves.
Start Care With The Correct Material Rule
Sealer: Not required for quartz, porcelain, or sintered stone.
Heat: Quartz — use a trivet every time. Porcelain and sintered stone — high heat performance, but follow the product and fabricator instructions.
Sun: Quartz — covered only, no direct sun. Porcelain — exterior use listed. Sintered stone — UV stable, exterior use listed.
Cutting: Use a cutting board on all three surfaces to protect the finish and your tools. Never cut directly on the surface.
Daily cleaning (all three): mild soap, water, and a soft cloth. Wipe spills promptly. For stubborn residue use a non abrasive cleaner approved for the surface. Do not apply sealer or polish.
Plan for real walls and final touchups. Countertops come first. Existing walls are rarely perfectly straight, square, or plumb, so review the finished wall line with the installer. Conventional tile backsplash generally follows the countertop. A full-height slab backsplash needs its own accurate field measurements, layout, outlet details, and installation scope. Schedule paint and drywall touchups last. Even with reasonable protection, moving heavy stone can cause minor scuffs to adjacent finished surfaces.
Warranty Checkpoint. Our Lifetime Residential Warranty covers manufacturing defects for quartz fabricated and installed in a private single family residence by an authorized Verona fabricator. The warranty applies to the original purchaser and is not transferable. Review the full warranty before purchase.
Final Release Checklist
One Page For The Final Handoff
Release cutting only when this list is complete.
Material And Slabs
Material chosen for actual use, heat, sun, and edge conditions.
Exact product, finish, thickness, lot, and slabs reserved.
Warranty and approved application reviewed.
Qualified fabricator confirmed for the material and applicable OSHA silica controls.
Layout And Fabrication
Vein direction and seam locations approved.
One-piece L or corner-seam decision approved, if applicable.
Cutouts and edge profile approved.
Overhang support approved.
Photo or digital slab map signed.
Transport path verified.
Cabinets And Site
Cabinets fixed, flat, true, and complete.
Panels, fillers, trim, and island position final.
Support and access plans approved.
Final wall plane ready to measure.
Fixtures
Sink on site and mounting style approved.
Independent sink support specified.
Faucet and accessory holes final.
Cooktop data and clearances final.
Bring To Your Slab Selection Visit
Bring your final cabinet door or finish sample, flooring sample, hardware selection, wall color sample, and clear room photos. Seeing these finishes beside a full slab makes undertones, contrast, veining, and overall balance easier to judge.
Verona Quartz Surfaces
9415 Telfair Avenue
Sun Valley, California 91352
818 962 3668
We help you select the slab. Independent qualified professionals own the field measurements, cutting plan, structural support, sink details, and installation for your site.
Sources And Our Role
Use The Exact Product Before Approval
Specifications can vary by design, thickness, and finish. Confirm the current product page and full warranty before purchase, then have your independent fabricator approve the final cutting, edge, support, and installation plan.
Sources
Verona Quartz Surfaces, Installation Guidelines. Quartz inspection, cutting, L-shaped corners, radius and seam conditions, support, sink, and fastening requirements.
Verona Quartz Surfaces, Frequently Asked Questions. Super jumbo quartz, porcelain fabrication, purchasing, care, and warranty statements.
Verona Quartz Surfaces, Care and Maintenance. Quartz cleaning, heat, cutting, sealing, and chemical guidance.
OSHA And NIOSH, Worker Exposure To Silica During Countertop Manufacturing, Finishing, And Installation. Applicable silica standards, exposure limits, wet methods, local exhaust, housekeeping, training, respiratory protection, and controlled shop work.
OSHA, 29 CFR 1910.1053, Respirable Crystalline Silica. General industry requirements for exposure assessment, engineering controls, work practices, written plans, and worker protection.
Our Role. We supply quartz, porcelain, and sintered stone slabs and help you compare the right surface for your project. We do not measure, cut, support, or install countertops. Those site specific decisions must be completed and approved by the independent qualified fabricator and installer responsible for the work.
Continue Exploring
View Quartz SurfacesView Porcelain SurfacesView Sintered StoneVisit Our ShowroomContact Verona