


12 mm Porcelain Slabs: Benefits, Applications & Fabrication
We are Verona Quartz Surfaces, a family owned wholesale supplier of full slabs in Sun Valley, California. We supply full slabs only. We do not fabricate, cut, template, or install. Cutting, edging, and installation belong to independent qualified fabricators and installers that you select, and much of this guide is devoted to helping you choose them well and hold them to a clear written scope.
This guide is written for homeowners, designers, architects, contractors, fabricators, dealers, and other technical buyers. It explains what our 12 mm porcelain slabs offer, where they work, what the testing behind them actually says, and what must be confirmed before fabrication and installation. It is not an installation manual: your fabricator and installer own the assembly decisions for your project, and this guide names those decisions and the answers to require.
For choosing designs, visiting the showroom, and comparing fabricator quotes, our See the Full Slab: Selection & Purchasing Guide carries that journey. For site readiness and installation-day sequencing, our Installation Readiness Guide covers it in full. We link to those guides rather than repeat them here.
On This Page
Download the 12 mm Porcelain Slabs Guide (PDF)
One Material for the Whole Home
What a 12 mm full slab is, and how to plan a project around it.
A Full Slab, Not a Tile
A full slab is a single panel 126 inches by 64 inches (56.00 square feet) — roughly ten and a half feet by five feet four inches — at 12 mm thick, carrying a fiberglass mesh backing, and rated for interior and exterior surfaces. That size is the reason porcelain can do what smaller formats cannot: fewer seams, longer runs, and designs that flow across a wall or a countertop without interruption. We offer 89 porcelain designs. Finishes vary by design; across the line they include polished, natural, honed, leather, silk, matte, carved, hammered, soft, and three-dimensional carved and natural textures, in single finishes and combinations. No design carries every finish, so confirm the finishes available for the design you want before you commit to it.
All of our designs are available book-matched, so two panels mirror each other at a seam like an open book, turning the joint into a feature instead of a flaw. If book-matching matters to you, say so early and see the slabs in person, including outside the showroom where daylight shows the design honestly.
Plan the Rooms Together
One material can cover your kitchen countertop, your bathroom floor, your shower wall, and your patio — in the same design, from the same slab. That continuity is the central planning advantage of 12 mm porcelain.
The finish changes the look and the feel underfoot and underhand, so see and touch large samples rather than judging from a small chip. If a floor will be walked on when wet, specify a textured finish and confirm slip suitability for that finish with your installer; the finish decision belongs with the room decision, not after it.
Why 12 mm Earns Its Place
Thick enough for countertops, lighter than 20 mm, versatile across rooms — with the limits stated.
A Balance, Not a Minimum
Twelve millimeters balances material thickness, manageable weight, large-format versatility, and fabrication possibilities. It is not a minimum threshold below which porcelain stops being useful, and this guide does not present it as one. Thinner 6 mm systems suit walls, backsplashes, and overlays.
Against Ordinary Porcelain Tile
Twelve millimeters equals approximately 0.47 inches. A nominal 9 mm porcelain tile is 3 mm thinner, so 12 mm is approximately 33 percent thicker than a nominal 9 mm tile. That comparison is useful for buyers accustomed to ordinary porcelain flooring and wall tile: a 12 mm slab is a substantially thicker panel, and that thickness is part of why it can carry countertop fabrication — mitered edges, cutouts, and built-up profiles — that tile cannot. Things to look out for in this comparison: some suppliers make 9 mm tile and some make it thinner — that is usually the case — so the comparison is against a nominal 9 mm tile, not against every tile. And 33 percent greater thickness does not automatically mean 33 percent greater strength; strength depends on the material, the test, and the assembly, and Chapter 3 gives the tested figures rather than a ratio.
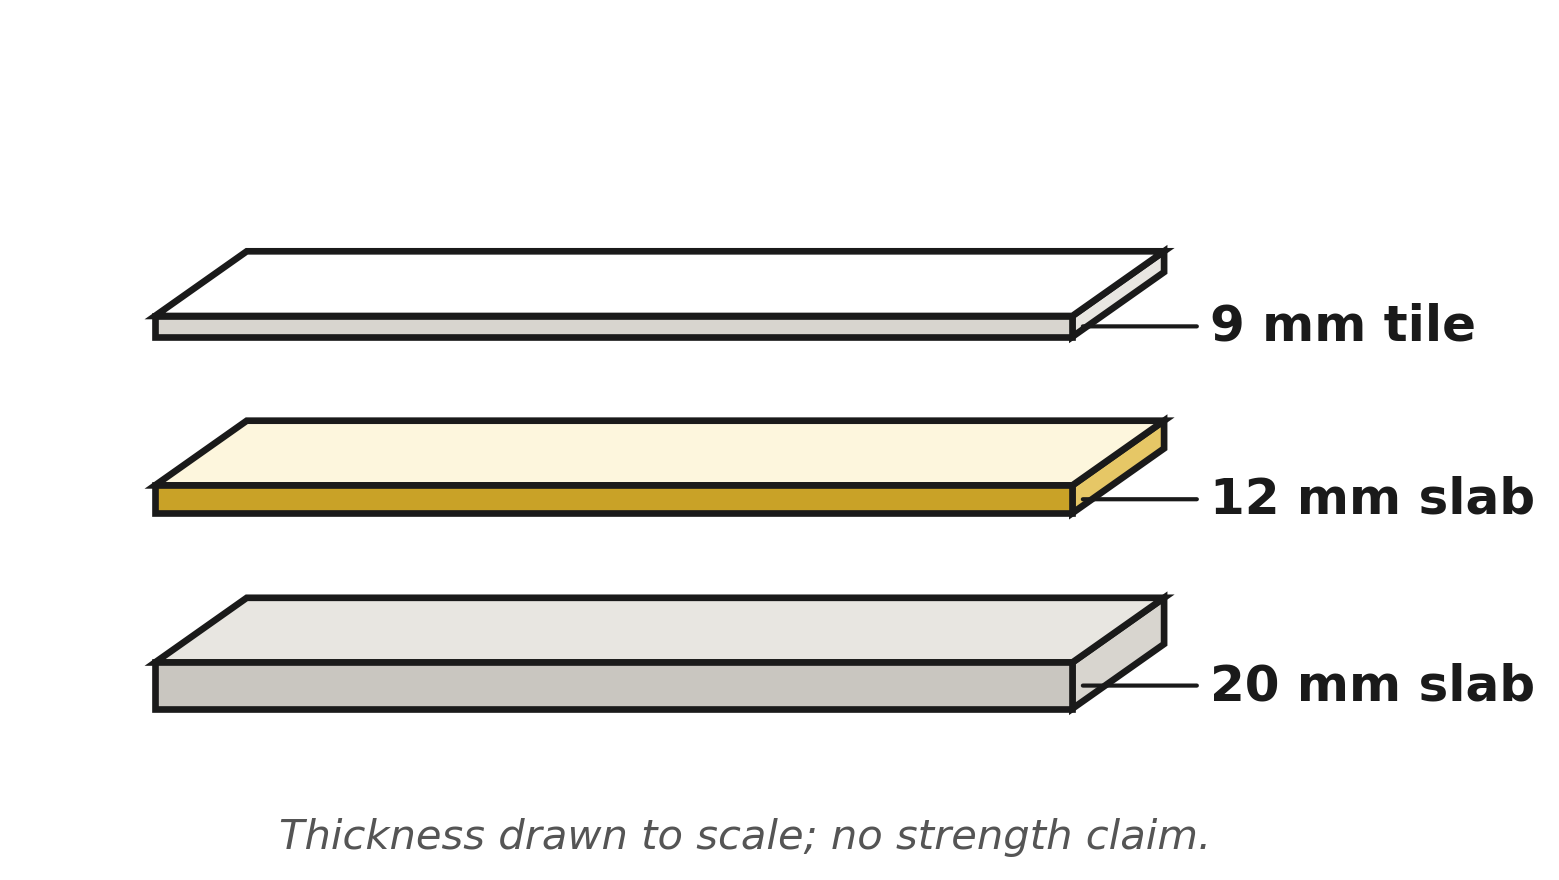
Figure 2-1. The three gauges as slabs: nominal 9 mm tile, 12 mm slab, and 20 mm slab, drawn to relative thickness. Thickness only; no strength claim.
Against 20 mm: Less Material, Same Care
Twelve millimeters is 40 percent thinner than 20 mm. For equal-size slabs of comparable material density, that means proportionally less mass to move, cut, and support — roughly 40 percent less material in the panel — which means, in practice: less mass to transport, store, and set; lower dead load on the supporting assembly; less material depth to cut through; and slimmer installed profiles. Those are real advantages. For planning, a full 12 mm slab weighs about 340 lb — about 565 lb at 20 mm for comparison — varying slightly by design, by our calculations for the full slab. It is a working figure, not a certified weight to the pound, so plan handling, equipment, and support around about 340 lb.
Less mass is not the same as light. A full 126 by 64 inch slab at 12 mm remains a heavy architectural product. It requires professional equipment and handling at every stage — transport, storage, cutting, and setting — and it is never a casual or unassisted lift. The weight advantage over 20 mm makes professional handling easier; it does not remove the need for it.
Why Some Fabricators Prefer 12 mm
For appropriately supported large-format installations, some professional fabricators prefer 12 mm for reasons that follow directly from the thickness: lower slab mass to handle, less material depth to cut through, mitered details fabricated from thinner stock, easier integration into supported architectural assemblies, and slimmer installed profiles. Cutting a thinner panel presents less material depth to the blade, which is a straightforward geometric fact. What this guide does not claim is any guaranteed blade-life saving, production-speed improvement, or reduced tool wear: blade performance also depends on the porcelain composition, the blade specification, the machinery, the feed speed, and the cooling. A shop that promises one should be asked for its evidence.
Tested Performance & Material Properties
Verified results first, plain-English explanations second.
Our 12 mm porcelain is supported by documented material testing covering water absorption, strength, thermal behavior, chemical resistance, and stain resistance. The following results explain how the material performs and what buyers should consider when selecting it for a project. Each row below names the property, the result, and the method, so a technical reader can verify it rather than take our word for it. These are family values: they describe the 12 mm porcelain line tested as a family, and your fabricator confirms the details for your specific slab and assembly. Where a project specification requires a product-specific test report, ask for that report rather than assuming a family value covers it.
| Property | Result for our 12 mm porcelain | Method / basis |
|---|---|---|
| Water absorption | 0.02% (reported result), well below the 0.5% classification threshold | ISO 10545-3; threshold E ≤ 0.5% for Group BIa porcelain |
| Breaking strength, 12 mm | At least 4,500 N | ISO 10545-4, family value |
| Modulus of rupture | At least 45 N/mm² | ISO 10545-4, family value |
| Deep abrasion | At most 175 mm³ | ISO 10545-6, family value |
| Thermal expansion | 6.3 × 10⁻⁶ °C⁻¹ | ISO 10545-8, family value |
| Thermal shock | Pass | ISO 10545-9, family value |
| Moisture expansion | Less than 0.1 mm/m | ISO 10545-10, family value |
| Crazing resistance | Pass | ISO 10545-11, family value |
| Frost resistance | Pass | ISO 10545-12, family value |
| Chemical resistance | Household and pool-solution agents class A; low-concentration acids/alkalis LA for some finish families, minimum LB for the others; high-concentration minimum HB | ISO 10545-13, finish-group dependent |
| Stain resistance | Class 5 | ISO 10545-14, family value |
| Dimensions | Tested and complying | ISO 10545-2; tolerance confirmed per slab and assembly |
Water Absorption: What 0.02% Means, and What It Does Not
We report a water absorption result of 0.02% for our porcelain — a very low figure, well below the conventional 0.5% threshold that defines the lowest-absorption porcelain classification. Low absorption drives three practical results: stain resistance, wet-room service, and candidacy for appropriately specified exterior use. Five distinctions govern how far that figure reaches, because each one is a different question. First, the figure describes the porcelain body, not the slip resistance of the finish you choose. Second, it does not make an installation waterproof: waterproofing is a property of the assembly — membranes, joints, drainage, and detailing — not of the slab alone. Third, freeze-thaw performance is a separate tested property (it passes under ISO 10545-12); absorption alone does not approve an exterior assembly. Fourth, suitability of the complete installed assembly depends on the product, finish, exposure, substrate, and installation system together. And fifth, the figure is our reported result for the porcelain; where a specification demands a product-specific report, confirm that report for your slab rather than treating a family figure as a per-slab certificate.
Strength, Heat, and Chemical Resistance in Plain English
Breaking strength of at least 4,500 newtons for a 12 mm panel, with a modulus of rupture of at least 45 newtons per square millimeter, means the panel carries tested strength for handling, fabrication, and installed service — not a promise that a slab cannot break. Porcelain is strong in place and unforgiving of a rushed cut, a point load, or an unsupported span, which is why Chapters 7 and 10 treat support and fabrication as assembly decisions rather than afterthoughts. Thermal-shock and frost passes mean the material itself handles temperature swings in testing; the installed assembly still needs joints, drainage, and movement accommodation designed for your climate and exposure. Chemical and stain results mean household agents and pool solutions at class A, with the finish-group variation stated in the table — check the class for your finish rather than assuming one class covers all of them. Dimensions are tested to ISO 10545-2 and comply; the tolerance for your specific slab and assembly is confirmed with your fabricator.
Indoor Air, Food Contact, and Marking
Our porcelain carries a French VOC class A+ rating — the highest class in the French volatile-organic-compound labeling system — across all collections. It carries NSF/ANSI 51 for food equipment materials, valid while the listing is maintained, and a European food-contact declaration under the EU food-contact framework, along with CE marking. These credentials matter in the order a buyer actually encounters them: indoor air for the home, food-contact suitability for kitchen surfaces, and marking for the product's declared conformity. None of them is a substitute for the assembly decisions in Chapters 7 through 11.
Environmental Transparency: The EPD, Stated With Its Scope
Our porcelain is covered by an independently verified Environmental Product Declaration (EPD) for porcelain stoneware surfaces, assessed under the construction-products rules EN 15804+A2 with the ceramic-tile complementary rules, and valid to October 2029. An EPD is a standardized, third-party-verified lifecycle declaration: it reports environmental indicators for a defined product scope so buyers can compare products on the same basis. An EPD is environmental documentation, not a product-performance certification: it describes environmental indicators, not how the slab performs in service. The scope matters here, and we state it plainly: that declaration covers 6.5 mm porcelain stoneware surfaces. It describes the lifecycle-assessment practice for the product family; it is not a declaration for 12 mm slabs, and this guide does not present it as one. If a project requires a 12 mm declaration, that is a question to raise with us before specification, not an assumption to carry into a bid.
Kitchens
Countertops, islands, backsplashes, range-hood cladding, and waterfall legs — where 12 mm does its best work.
Countertops and Islands
The kitchen countertop is where 12 mm earns its keep. Two 45-degree cuts in 12 mm stock join into a mitered edge, so a countertop can carry a thick, furniture-like profile built from 12 mm stock. Settle seam locations early. With a 126 by 64 inch slab, seams are fewer than with smaller formats, but a long island or an L-shaped run will still have them. Decide where they fall while you can still choose, and confirm how the shop finishes them and how the book-match reads across them. Before you hire a shop, look at a mitered edge it built in porcelain: the edge is the clearest evidence of a porcelain shop, because it shows the cutting, the joint, and the finishing together.
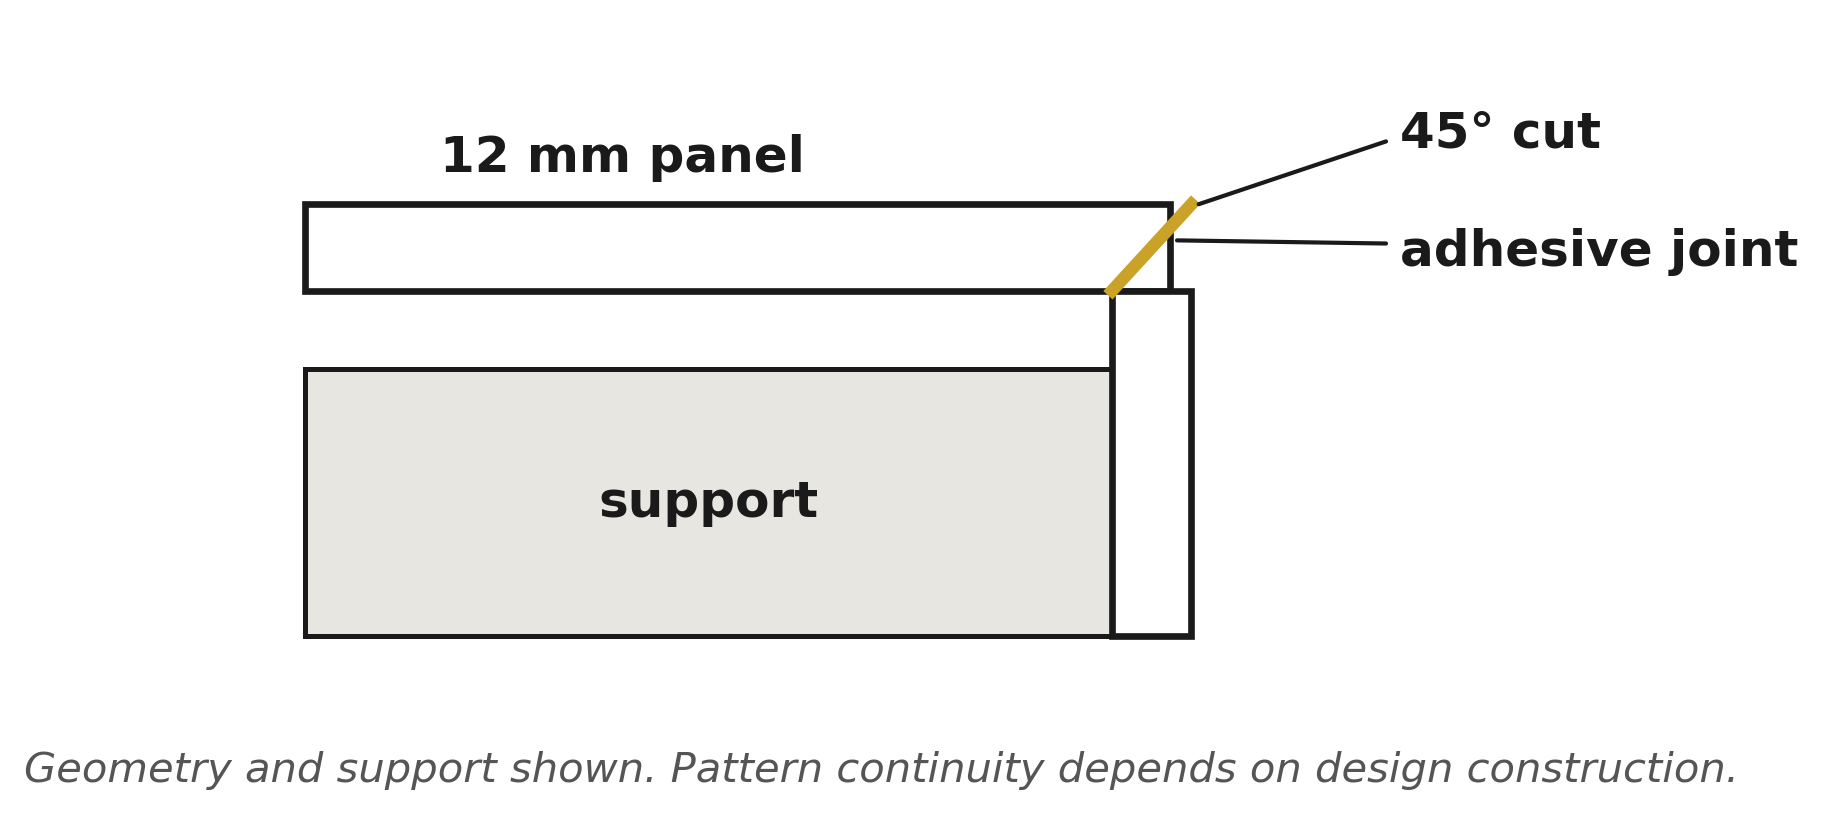
Figure 4-1. A mitered edge: two 45-degree cuts in 12 mm stock joined to form a thick built-up countertop edge, shown with the supporting assembly beneath.
Pattern Continuity at the Miter
A mitered edge reads as one thick panel only if the design continues around the joint. Whether it does depends on how the design is made: some porcelain designs carry their pattern through the body, while others carry it as a surface treatment, and a surface design will not continue through the body at a miter. Confirm the construction of your design before assuming a continuous edge, and confirm with your fabricator how the joint will read for that design. The adhesive, the joint finish, and the edge profile all belong in the written quote.
Full-Height Backsplashes
A full-height backsplash in the same design as the countertop shows 12 mm at its best: fewer grout joints, large-format continuity from counter to upper cabinets, and no material change at the most visible wall in the kitchen. The 12 mm porcelain body is 8 mm thinner than a 20 mm body before adhesive, substrate, and trim — and that thinner body simplifies outlet, trim, and countertop-to-backsplash details, because there is less material depth to work around. The finished installed depth difference is not always exactly 8 mm: adhesive beds, substrates, and trim vary by assembly, so confirm the installed depth for your assembly rather than assuming the body difference is the finished difference. Full-height runs also need the framing behind them confirmed to carry full slabs, and the seam plan settled before fabrication, since a tall run may need more than one panel.
Range-Hood Surrounds and Cladding
Wrapping an appropriately designed kitchen range-hood enclosure in matching porcelain carries the countertop and backsplash design up the wall and turns the hood into part of the architecture rather than an appliance interruption. It is a professional design application, not a default: not every hood can be clad, and the decision requires confirmation of the exact product and assembly before anyone orders material. The points to settle, in order: design continuity (does the hood panel align with the backsplash seams and the countertop design, and does the pattern read correctly across the enclosure faces); the slimmer material profile (12 mm keeps the enclosure face thinner than a 20 mm build, which matters where the hood sits close to cabinetry or a mantel line); weight and support (the enclosure structure must be confirmed to carry full panels, including any cantilevered or projecting faces); heat and clearance (the hood manufacturer's instructions and the applicable clearance requirements govern — cladding does not reduce a required clearance, and heat exposure at the enclosure must be confirmed for the exact hood and cooking arrangement); ventilation and maintenance access (panels must not block access the hood needs for service, filters, or ductwork); and fire-rated assemblies where applicable (where the wall or enclosure is part of a rated assembly, the cladding system must be confirmed against that rating — a decorative panel is not a fire rating). Where any of those points cannot be confirmed for your hood, the honest answer is a different enclosure treatment, not a forced clad.
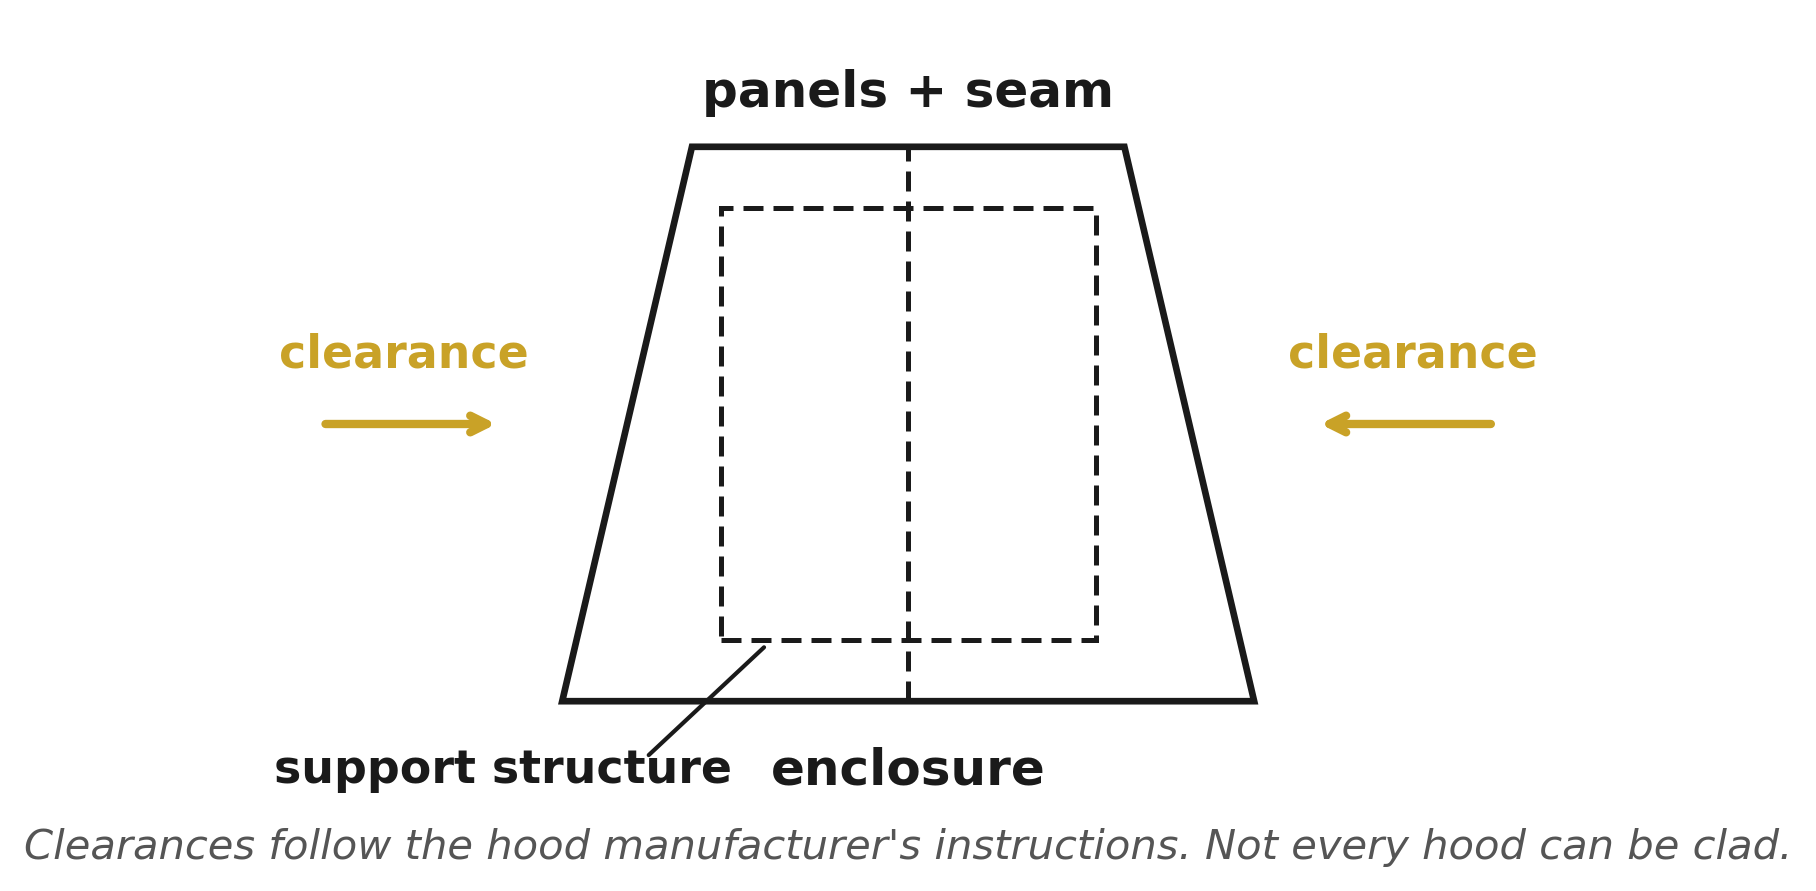
Figure 4-2. Porcelain-clad range-hood concept: enclosure, panels, seams, support structure, and clearance zones, with a qualification note on the figure stating that clearances follow the hood manufacturer's instructions and that not every hood can be clad.
Waterfall Legs
A waterfall leg carries the countertop design straight down the side of an island or peninsula to the floor. It is a mitered joint done vertically, and it exposes both the design and the shop's craft. Support and anchorage for the leg are structural questions, not just visual ones: the leg panel, its footing, and its connection to the countertop and the floor all belong in the written scope, along with how the pattern continues (or does not) around the vertical miter. Confirm all of it before fabrication, because a waterfall leg is difficult to correct after the panels are cut.
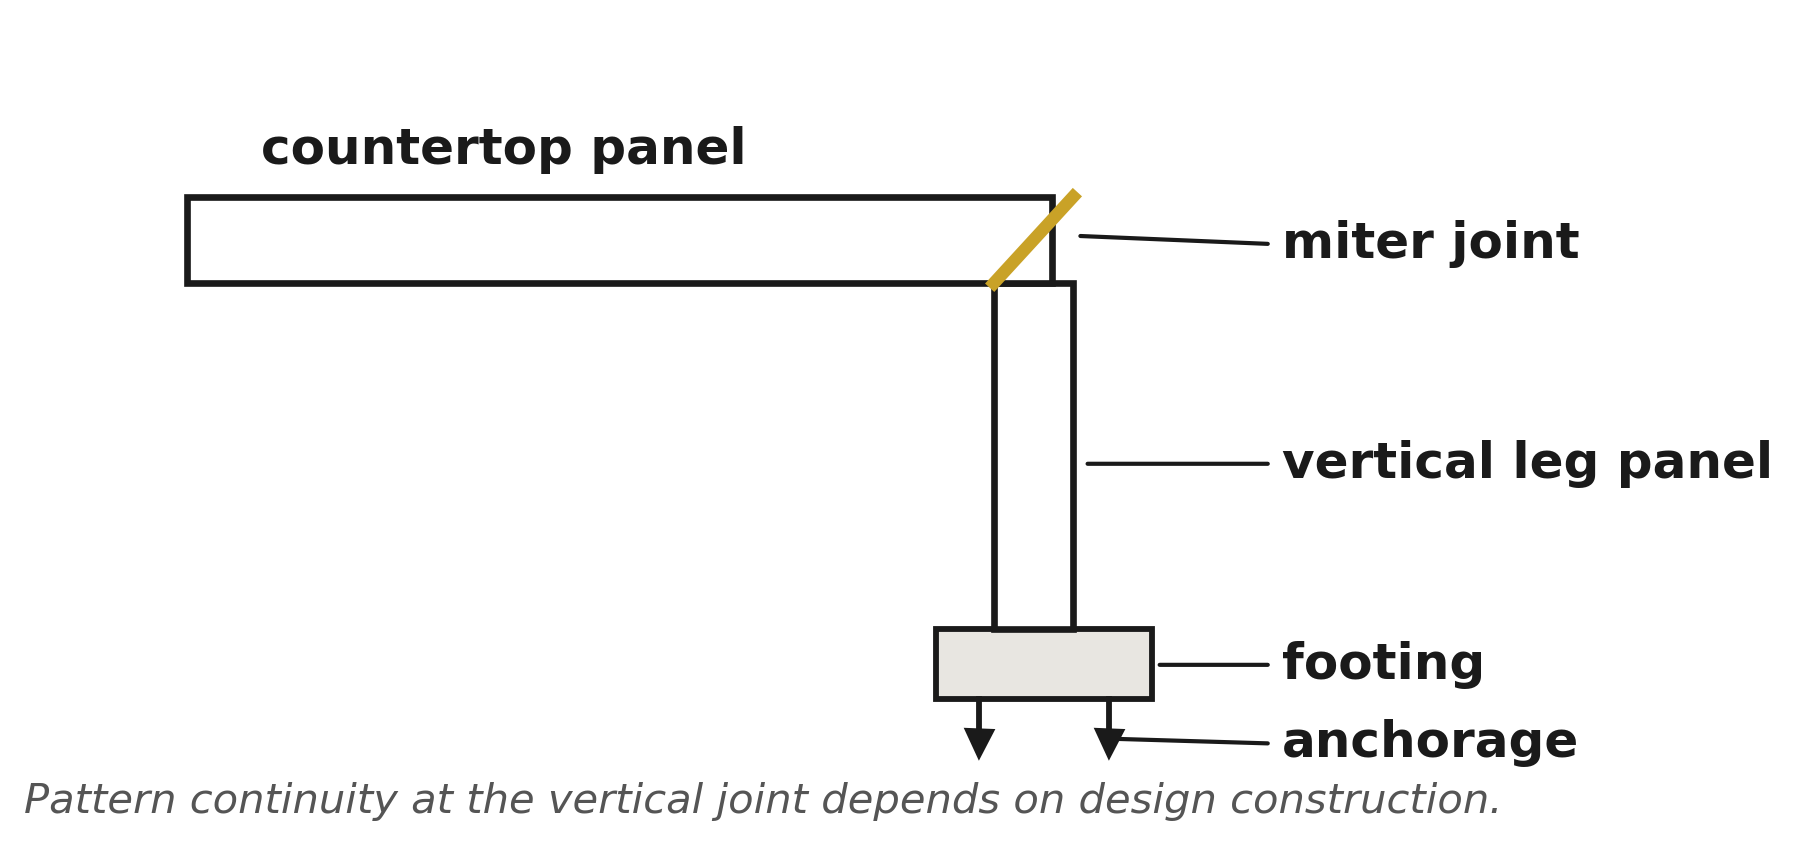
Figure 4-3. Waterfall island detail: countertop panel, vertical leg panel, miter joint, footing, and anchorage, with a note on pattern continuity at the vertical joint.
Sinks and Cutouts
Sink and cooktop cutouts are the most stressed parts of a countertop, which is why inside corners are rounded rather than cut sharp: sharp corners concentrate stress. Settle sink mounting and cooktop cutouts early, because the cutout and the support around it affect the whole countertop. No single mounting or reveal suits every sink: a flush-mounted undermount at zero reveal stops the slab edge at the sink, while a negative reveal carries the slab edge into the sink opening, and each option has different fabrication, maintenance, clearance, and edge-exposure considerations. Your qualified fabricator confirms the appropriate mounting and reveal for your sink, your edge profile, and your maintenance expectations — that confirmation, with the cutout locations, belongs in the written quote.
Support Under the Countertop
Support under a countertop is an assembly decision, not a universal figure. Systems differ in how they handle it: continuous substrates, cabinet support, reinforcing elements, and permissible spans all vary by system, span, and layout. There is no single number that covers every kitchen, and this guide does not invent one. What belongs in every project is a written support method for every countertop run and every overhang: which system, which spans, which reinforcing elements, and who confirms them. If a quote does not name the support method, the quote is not finished. Where no approved system is documented for your assembly, do not assume one — confirm it with the fabricator and with us before fabrication begins.
Bathrooms and Interiors
Floors, shower walls, vanity tops, and full-height walls — with finish and waterproofing kept distinct.
Bathroom Floors
A bathroom floor is a wet floor, so the finish decision matters more here than anywhere else. Specify a textured finish, confirm slip suitability for the finish you choose with your installer, and confirm the grout plan — grout lines are the part of a bathroom floor that needs ongoing care, while the slab body ordinarily does not require routine sealing. A large-format floor also means fewer grout lines to clean. No finish in this guide is presented as suitable for every wet floor: confirm the finish for your room, your drainage, and your exposure.
Shower Walls
Shower walls show large format at its best in a bathroom: one design running with minimal joints, less grout to maintain, and a surface that handles daily wetting. The slab is not the waterproofing system. Membranes, joints, drainage, and detailing behind and around the panels are what keep water out of the wall, and they belong to the installer's assembly design, confirmed in writing before panels are set. Where a shower wall is a full-height run, the framing behind it must be confirmed to carry full slabs before the slabs arrive.
Vanity Tops and Full-Height Walls
Vanity tops follow the kitchen rules at smaller scale: mitered edges, cutouts for basins, support beneath, and seams placed deliberately. Sink assemblies need the same treatment as kitchen sinks — mounting and reveal confirmed with the fabricator for the basin, the edge profile, and maintenance — and the support beneath the vanity top belongs in the written scope. Full-height walls are the dramatic move: a single design running floor to ceiling, book-matched across seams. Tell your installer about full-height walls early so the framing behind them is confirmed to carry full slabs. Weight is not a reason to avoid the look; it is a reason to plan the framing before the slabs arrive.
Floors Through the House
Interior floors show continuity at its best: one design flowing from room to room, with fewer grout lines and no material change at thresholds. Two substrate principles decide whether a floor succeeds. First, the substrate must be flat and stiff enough for large panels — your installer checks this before quoting, not after setting. Second, if radiant heat is planned or present, the full assembly must be designed for thermal cycling: porcelain conducts heat well and performs over radiant systems when the assembly is designed for thermal cycling, so confirm the installer's method for temperature change in writing. From an interior floor straight out onto a patio, the same continuity is possible only as a bonded assembly designed for exposure, drainage, and temperature change, with a finish confirmed suitable for the exterior walking surface — see Chapter 6.
Outdoors and Architectural Cladding
Bonded outdoor surfaces — and where pavers, fascia, and engineered systems take over.
Where 12 mm Goes Outside
Our 12 mm slabs carry a general rating for interior and exterior surfaces, and they belong outside in bonded assemblies designed for the exposure: patios, outdoor kitchens, and pool surrounds where the slab is fully bonded to a prepared substrate. The freeze-thaw and thermal-shock testing behind the slab supports that use — the material handles temperature swings in testing. The assembly decides whether it holds up: your installer designs the bonded assembly for exposure, drainage, and temperature change, and that design belongs in the written scope before work begins. A bonded outdoor surface is a system, not just a slab laid outside.
That general rating is not a per-application approval. Bonded use requires confirmation of the specific product, the finish, the exposure, the substrate, and the installation system together. Wet walking surfaces need particular care: confirm slip suitability for the finish on that surface, in that exposure, before anyone orders material. Pool surrounds add chemical exposure and constant wetting to the same questions. Where any element cannot be confirmed for your project, the honest answer is a different product or system, not a forced approval.
Drainage and Joints, Briefly
Drainage and joints decide whether an outdoor bonded assembly lasts: water must leave the surface, joints must accommodate movement, and the substrate must stay stable through wetting and temperature cycles. Those three items belong in the written scope for every outdoor job, alongside the product and finish confirmation. If a quote describes an outdoor slab without naming drainage, joints, and movement accommodation, it is not a complete outdoor quote.
Fascia and Architectural Cladding: Keep the Systems Distinct
Architectural cladding is where careful language matters most, because several different systems share the word "cladding" and they are not interchangeable. Interior decorative cladding is a panel fixed to an interior wall for appearance, where the wall behind it carries the load. Exterior fascia is a panel applied to a building face for appearance and weather protection, where the fixing and the substrate must suit the exposure. An engineered facade or rainscreen system is a designed assembly — panels, supports, ventilation, drainage, and fixings engineered together, often with mechanical support. A mechanically supported system carries panels on rails, anchors, or frames rather than on adhesive alone. A fully bonded installation adheres panels directly to a prepared substrate, and it is appropriate only where specifically approved for that product, substrate, and exposure. Do not transfer one manufacturer's exterior-system approval to another product, and do not read a general exterior rating as an approval for every wall system. Where no facade approval for our slabs is documented for your system, the design discussion stays conditional: the project requires verification from us and the project engineer for the exact product, panel size, fixing method, and exposure before specification. That verification is part of the design, not an obstacle to it.
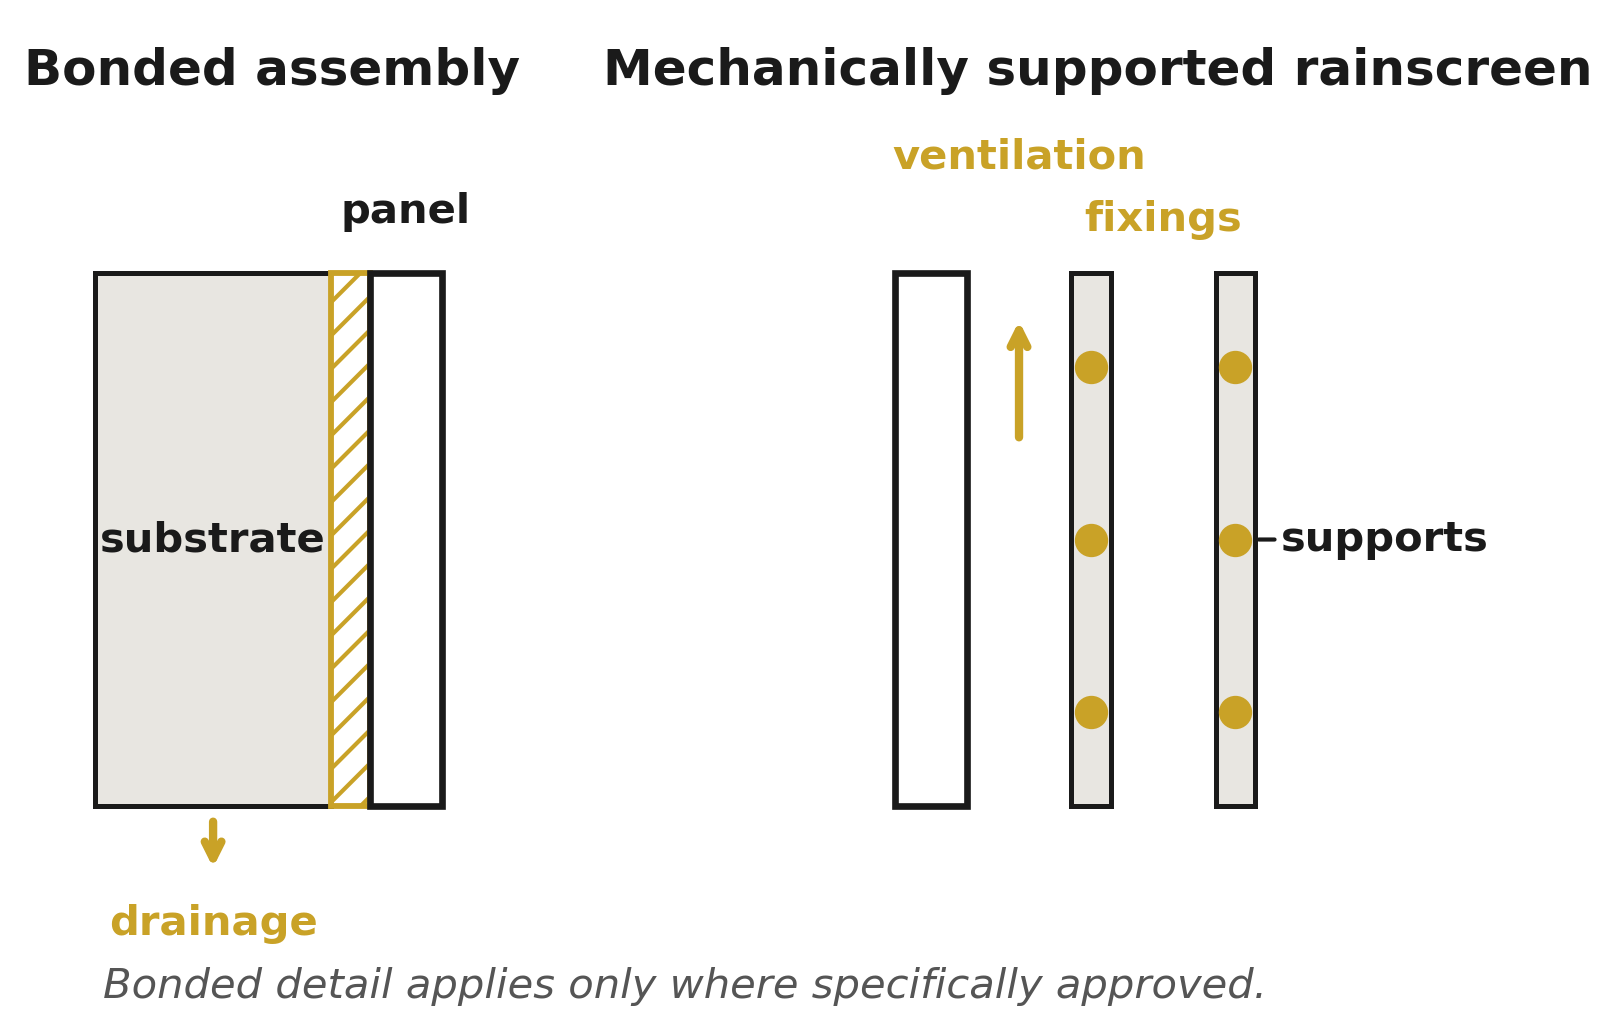
Figure 6-1. Exterior architectural detail: a bonded panel assembly beside a mechanically supported rainscreen assembly, with supports, ventilation, drainage, and fixings labeled, and a note stating that the bonded detail applies only where specifically approved.
| Application | What to confirm before ordering | What this guide does not promise |
|---|---|---|
| Kitchen countertop / island | Fabricator's porcelain experience; miter evidence; seam plan; support method per run; cutout and reveal details | A universal support figure or overhang number |
| Full-height backsplash | Installed depth for your assembly; framing; seam plan; book-matching | That the finished depth difference is always exactly 8 mm |
| Range-hood cladding | Hood manufacturer's instructions; clearances; support; ventilation and maintenance access; fire rating where applicable | That every hood can be clad |
| Waterfall leg | Support and anchorage; footing; pattern continuity at the vertical miter | That every miter has a continuous through-body pattern |
| Bathroom / interior floor | Finish slip suitability; substrate flatness and stiffness; radiant-heat assembly design where applicable | That every finish suits every wet floor |
| Shower wall | Waterproofing assembly (membrane, joints, drainage); framing for full-height runs | That the slab alone waterproofs a shower |
| Bonded patio / pool surround | Product, finish, exposure, substrate, installation system; drainage, joints, movement; slip suitability for wet walking surfaces | Blanket approval of all slabs for all bonded exteriors |
| Exterior fascia / facade | System type (bonded vs mechanically supported vs rainscreen); verification from us and the project engineer for the exact product and exposure | Any transferred approval from another manufacturer's system |
| Roof / balcony deck, dry-laid patio | Whether the project is a paver project, not a slab project | That 12 mm slabs substitute for pavers in pedestal systems |
Table 6-1. Application suitability matrix: a verification checklist, not a blanket approval. Every row ends in a confirmation, not a promise.
What Your Fabricator Does
Cutting, edging, seams, and support — the craft behind the finished surface.
Cutting and Edging
Fabrication is where a slab becomes a countertop. The shop saws the slab to size, cuts openings, shapes and profiles the edges, and joins mitered edges into thick profiles. All of it is done wet, for reasons Chapter 9 covers, and all of it is done on material that behaves like glass until it is installed: strong in place, unforgiving of a rushed cut. Cutting 12 mm presents less material depth than cutting 20 mm, which is one reason some shops prefer the gauge — and it is not a reason to rush. Feed speed, blade selection, cooling, and the shop's porcelain experience decide the quality of the cut far more than the thickness alone.
Seams
Seams deserve a conversation, not a surprise. Confirm where they will fall, how they will be finished, and how the book-match reads across them. A well-placed seam disappears into the design; a poorly placed one interrupts it. The time to decide is during the quote, when moving a seam costs nothing.
Cutouts and Corners
Sink and cooktop cutouts are the most stressed parts of a countertop, which is why inside corners are rounded rather than cut sharp. Confirm the shop's cutout practice — how it rounds corners, how it supports the span around a sink, and what it does differently for porcelain than for other stones. The answers tell you quickly whether you are talking to a porcelain shop.
Support and Substrates
Countertops need their support method named in writing. Floors need substrates that are flat and stiff. Walls need framing confirmed to carry full slabs. None of these has a single universal figure, because each depends on your layout, your home, and your fabricator's and installer's systems. What you should demand instead is written confirmation: support, substrate preparation, and framing, all named in the quote. A quote that names them is a quote you can hold someone to. For mesh-backed slabs, confirm adhesive compatibility and preparation with the fabricator and with us: the backing is part of the assembly, and the adhesive and preparation method must suit it. No specific adhesive product is named in this guide — the confirmation itself is the requirement.
Fiberglass Mesh Backing
What the backing does, what it does not do, and what to confirm about adhesives and preparation.
Our 12 mm porcelain slabs feature fiberglass mesh backing bonded to the underside of the slab. This reinforcing layer is intended to assist handling and fabrication and help retain fragments if a panel breaks. It provides added reassurance during work with large-format slabs, but it does not make the porcelain unbreakable or replace appropriate support and installation methods.
The backing measures approximately 1–1.5 mm thick by our observation. Mesh backing is not an industry requirement for porcelain slabs, but we include it because fabricators appreciate the easier handling it gives our porcelain and the added safety element if a panel breaks.
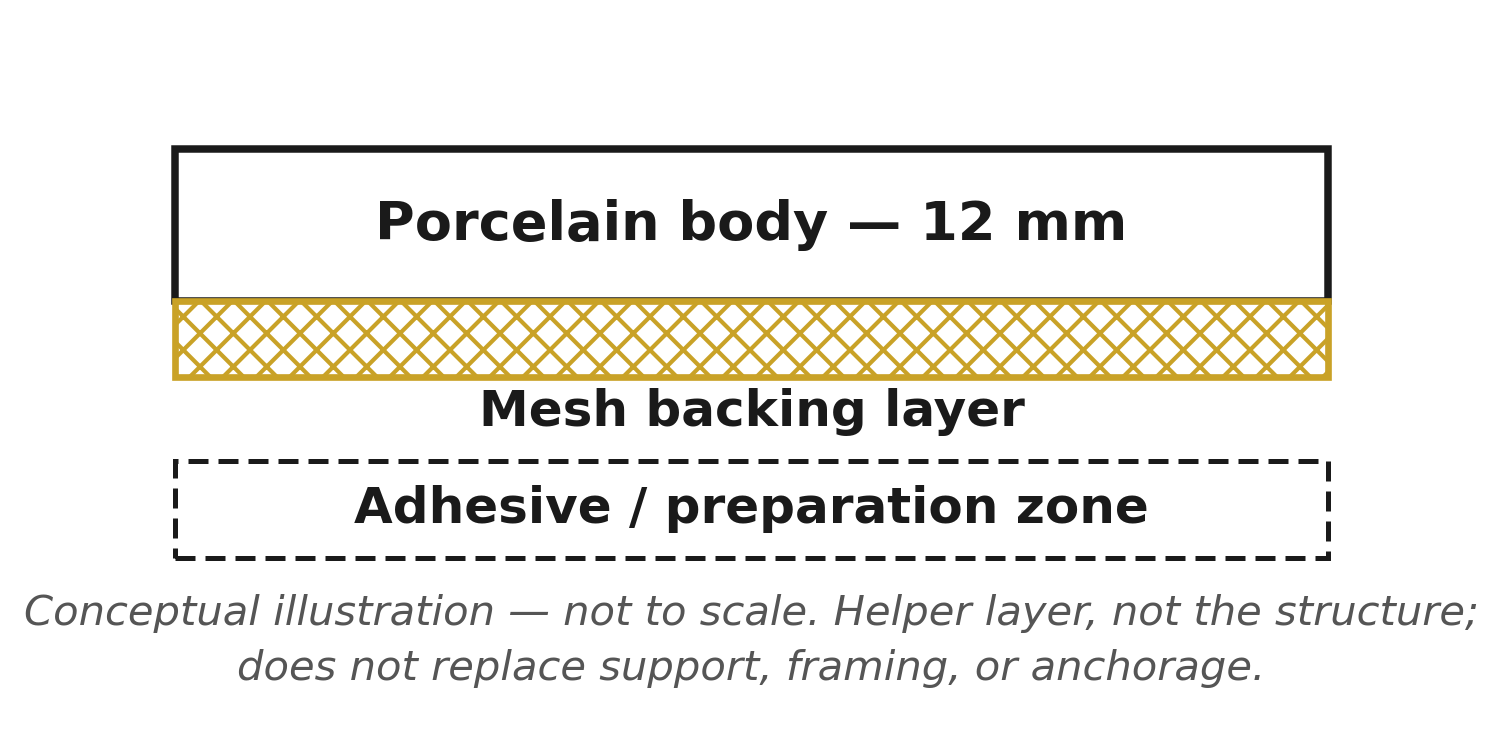
Figure 8-1. Fiberglass mesh backing cross-section, showing the porcelain body (12 mm), the mesh backing layer, and the adhesive/preparation zone. The figure carries the qualification on its face: the mesh is a helper layer, not the structure; it does not replace support, framing, or anchorage. The illustration is conceptual and not to scale; the backing measures approximately 1–1.5 mm thick by our observation.
The limits are just as important. The mesh is a helper, not the structure. It does not make a slab unbreakable, and it does not replace proper handling, support, attachment, waterproofing, or engineering. A mesh-backed panel still needs the support method in Chapter 4, the framing in Chapters 5 and 6, and the waterproofing assembly in Chapter 5 — the mesh helps within those assemblies; it does not substitute for any of them. This guide claims no fire rating, no structural capacity, and no specific fragment-retention performance for the mesh. If a project specification requires any of those, that is a documentation question to raise before specification, not a property to assume.
Two practical confirmations belong with the mesh. First, adhesive compatibility: the adhesive and preparation method must suit a mesh-backed panel, and your fabricator confirms both with us for your assembly — the confirmation is the requirement, and no specific adhesive product is named here. Second, preparation: the backing must be prepared as the fabricator's and our method directs before setting; a panel set with the wrong adhesive or the wrong preparation is a panel set on an assumption. Both confirmations belong in the written scope.
Safe Fabrication and Dust
The brief version: professional shops, wet methods, and exposure controls.
Cutting and grinding porcelain can create hazardous airborne dust, including respirable crystalline silica. That is why fabrication belongs in a professional shop with exposure controls, not on site with a dry saw. A shop doing this work properly uses wet cutting methods, ventilation and localized extraction, wet or HEPA-filtered cleanup (never dry sweeping or compressed air on dust), and respiratory protection selected for the task — under the existing California and federal silica requirements that govern this work, including the permissible exposure limit of 50 micrograms per cubic meter and the action level of 25 micrograms per cubic meter as 8-hour time-weighted averages. The details of a shop's exposure plan, housekeeping, and respirator program belong in your conversation with the shop: a shop that explains its dust plan without being asked is a shop that takes the work seriously. Intact installed panels present no known dust hazard in normal use; the hazard is in cutting, grinding, and polishing, which is exactly where the controls apply. This section is deliberately brief: it states the hazard, the controls, and the existing limits, and it leaves the shop's plan to the shop — verified in writing, not assumed.
Who Is Responsible for What
One chart, no confusion about who owns each step.
| Step | Owner | What "done" looks like |
|---|---|---|
| Supply the full slabs | We | Slabs as specified, in the design and finish ordered, available in the quantity confirmed. |
| Final measurements and templating | Your fabricator | Field measurements and templates taken at your home, in writing. |
| Fabrication: cutting, edging, miters, cutouts | Your fabricator | Work per the written quote: edge profiles, miter evidence, seam plan, cutout and reveal details. |
| Support, substrate, and framing confirmation | Your fabricator and installer | Support method per run, substrate preparation, and framing — all named in the quote. |
| Installation and setting | Your installer | Panels set per the confirmed assembly, including adhesive compatibility for mesh-backed slabs. |
| Waterproofing assembly (wet rooms) | Your installer | Membrane, joints, drainage, and detailing confirmed in writing before setting. |
| Exterior assembly design (bonded, fascia, facade) | Your installer, with verification from us and the project engineer where required | System type, product, finish, exposure, substrate, and fixing method confirmed before ordering. |
| Final walkthrough and care guidance | Your fabricator and installer | Care instructions for the slab, grout, joints, and finish-specific maintenance, in writing. |
What Must Be in Your Fabrication Quote
A finished quote names: the design, finish, and quantity of slabs; edge profiles and mitering, including waterfall legs where planned; seam locations and finishing, and book-matching; cutout locations, sink mounting, and reveal details; the support method for every countertop run and overhang; substrate preparation and framing confirmation; adhesive compatibility and preparation for mesh-backed slabs; the dust plan for fabrication; the waterproofing assembly for wet rooms; drainage, joints, and movement accommodation for outdoor work; and the system verification for any fascia or facade work. Compare written scopes, not headline prices: two quotes that name different scopes are not comparable, and the cheaper one is usually the one that left something out.
Qualify Your Fabricator and Installer
The questions that separate a porcelain shop from a general stone shop.
Meet three or more shops. Porcelain fabrication is a specialty: the cutting, the mitering, the dust controls, and the assembly details differ from other stones, and a general stone shop's reputation does not transfer automatically. The five questions below each start with why the question matters, so you can judge the answer rather than just collect it.
- Show me a mitered edge you built in porcelain. The edge is the clearest evidence of a porcelain shop: it shows the cutting, the joint, and the finishing together. A shop that cannot show one has not done this work at the level your project needs.
- How do you support this countertop, run by run? Support is assembly-specific, so a good answer names the system for your spans and layout — continuous substrate, cabinet support, reinforcing elements, or a combination — rather than a slogan. A vague answer is a red flag.
- What is your dust plan? Wet methods, extraction, cleanup, and respiratory protection under the existing exposure limits (Chapter 9). A shop that explains its plan without being asked is a shop that takes the work seriously; a shop that dismisses the question is not.
- How do you handle seams, book-matching, and cutouts for this design? Seam placement, finishing, book-matching, cutout rounding, and sink mounting and reveal — all decided during the quote, when moving a seam costs nothing.
- What exactly is in your written scope, and what is not? Support, substrate, framing, adhesive compatibility for the mesh backing, waterproofing for wet rooms, drainage and joints outdoors, and system verification for fascia or facade work. Compare scopes, not prices.
Red Flags
A quote with no support method named. A shop that cannot show a porcelain miter. A dust plan that amounts to dry cutting. A promise that every finish suits every wet floor, every slab suits every exterior wall, or every hood can be clad. A price that undercuts every competitor by leaving scope out. Any of these is a reason to keep interviewing, not a reason to negotiate the same shop down.
Frequently Asked Questions
Can 12 mm really be a countertop?
Yes. Twelve millimeters is the gauge we build this guide around for countertops, floors, and walls in one material — not because thinner gauges cannot serve a countertop in some systems, but because 12 mm balances thickness, mass, versatility, and fabrication for the widest range of projects. Mitered edges give a countertop a thick, furniture-like profile built from 12 mm stock, and the support method for every run completes the assembly. The gauge is only half the story — the fabricator's craft is the other half, which is why Chapter 11 matters.
How much lighter is 12 mm than 20 mm?
Twelve millimeters is 40 percent thinner than 20 mm, so at equal size and comparable density it carries proportionally less mass — roughly 40 percent less material to move, cut, and support. For planning, a full slab weighs about 340 lb (Chapter 2), and still requires professional equipment and handling.
What does the 0.02% water absorption figure mean?
It is our reported result for the porcelain body: very low absorption, well below the conventional 0.5% classification threshold. It supports stain resistance and wet-room and exterior candidacy, but it does not make an installation waterproof, does not set a finish's slip resistance, and does not approve an assembly on its own. Chapter 3 states all five distinctions.
Does porcelain need sealing?
The dense porcelain body ordinarily does not require routine sealing. Grout lines are a different story: where slabs meet grout, the grout itself needs the care your installer recommends, and joints, backing, adhesives, and finish-specific maintenance instructions are separate. Maintenance stays simple when the distinction holds: wash the slab, care for the grout, and follow your installer's care guidance for the rest.
What does the mesh backing do?
The fiberglass mesh backing — approximately 1–1.5 mm thick by our observation — helps during handling and fabrication, and helps hold fragments together if a slab is ever damaged. It does not replace support, framing, or anchorage, and it does not make a slab unbreakable. Think of it as a helper layer, not the structure. Chapter 8 gives the full account, including what is not claimed for it.
Can one design run through kitchen, bathroom, and patio?
Yes — kitchen countertops, bathroom floors, shower walls, and bonded outdoor surfaces can all carry one design in 12 mm, provided each application is confirmed for its product, finish, exposure, substrate, and system. Plan the rooms together, confirm availability of the quantity you need early, and tell your fabricator where you want book-matching.
Where do 20 mm pavers belong instead of slabs?
In bonded assemblies designed for exposure, drainage, and temperature change — patios, outdoor kitchens, and pool surrounds — 12 mm slabs belong. Roof decks, balcony decks, and dry-laid patios typically use 20 mm pavers instead, on pedestal systems, mortar beds, or compacted beds. Your installer confirms which category your project falls into.
Who does what on my project?
We supply the full slabs. Your fabricator measures, templates, cuts, edges, and miters. Your installer sets the panels and owns the substrate, framing, waterproofing, and exterior-assembly confirmations. Chapter 10 charts every step, and Chapter 11 tells you how to qualify the shops you hire.
Sources
Every major claim in this guide traces to one of the sources below. Specifications are family values for our 12 mm porcelain line; your fabricator confirms the details for your specific slab and assembly. No supplier names, certificate numbers, facility locations, or supplier URLs appear in this guide; our internal performance register carries full audit traceability for each entry.
- Slab size, thickness, design count, finishes, general rating. Our product records for the 12 mm porcelain line (89 designs; 126 by 64 inches; 12 mm; interior and exterior surfaces; finishes as listed per design). Finishes vary by design; confirm per design.
- ISO 10545 family test values. Technical specification sheets for the 12 mm porcelain line (Group BIa large-format porcelain slab): absorption threshold E ≤ 0.5% (ISO 10545-3); breaking strength at least 4,500 N at 12 mm, rupture at least 45 N/mm² (ISO 10545-4); deep abrasion at most 175 mm³ (ISO 10545-6); thermal expansion 6.3 × 10⁻⁶ °C⁻¹ (ISO 10545-8); thermal shock pass (ISO 10545-9); moisture expansion under 0.1 mm/m (ISO 10545-10); crazing pass (ISO 10545-11); frost pass (ISO 10545-12); chemical resistance per ISO 10545-13 (household and pool-solution agents class A; low-concentration acids/alkalis LA for some finish families, minimum LB for the others; high-concentration minimum HB); stain class 5 (ISO 10545-14); dimensions complying (ISO 10545-2). Water absorption 0.02% is our reported result for the porcelain, stated against the documented 0.5% threshold.
- French VOC class A+. French volatile-organic-compound labeling, highest class, stated for all collections.
- NSF/ANSI 51; European food-contact declaration; CE marking. Food-equipment-materials listing (valid while listed); EU food-contact framework declaration; CE marking. Each cited generically, as listed.
- Environmental Product Declaration. Independently verified EPD for porcelain stoneware surfaces under EN 15804+A2 with ceramic-tile complementary rules, valid to October 2029. Scope: 6.5 mm surfaces — not a 12 mm slab declaration.
- Fabrication safety and handling guidance. Safety instructions for working with ceramic tiles (instruction leaflet, not a safety data sheet): ventilate, avoid dust, prefer wet methods, localized extraction, suction or wet cleaning. Adapted here to US practice under existing California and federal silica requirements (permissible exposure limit 50 µg/m³; action level 25 µg/m³, 8-hour time-weighted averages).
- Installation principles (substrate, support, joints, movement). Industry installation practice as summarized in the research behind this guide, applied here as principles, never as universal figures: support, substrate flatness and stiffness, framing, drainage, joints, and movement accommodation are assembly-specific and confirmed per project. No ANSI strength band is attributed to 12 mm porcelain, and no movement-joint spacing, overhang, radius, or coverage figure is stated as universal.
- Slab weight. About 340 lb per full 12 mm slab (about 565 lb at 20 mm for comparison), varying slightly by design, by our calculations for the full slab. Stated as an approximate working figure, not a certified weight.
- Companion guides. See the Full Slab: Selection & Purchasing Guide; Installation Readiness Guide.
Your 12 mm Checklist
Print this page and carry it to the showroom and to every fabricator meeting. A finished project is a confirmed scope, not a hopeful one.
- Design and finish chosen from large samples; finishes confirmed available for that design.
- Quantity confirmed for every room the design will run through; book-matching confirmed where wanted.
- Three or more fabricators met; a porcelain mitered edge seen from each finalist.
- Support method named for every countertop run and overhang; substrate and framing confirmed.
- Seam plan, cutout locations, sink mounting, and reveal details in the written quote.
- Adhesive compatibility and preparation for the mesh backing confirmed.
- Dust plan explained by the shop: wet methods, extraction, cleanup, respiratory protection.
- Waterproofing assembly confirmed for wet rooms; drainage, joints, and movement for outdoor work.
- Exterior system type confirmed (bonded vs mechanically supported vs rainscreen); verification from us and the project engineer where required.
- Hood cladding confirmed against the hood manufacturer's instructions and clearances, where planned.
- Written scopes compared, not headline prices; care guidance for slab, grout, joints, and finish received in writing.
Continue Exploring
View Quartz SurfacesView Porcelain SurfacesView Sintered StoneVisit Our ShowroomContact Verona